


听说uni-app牛逼的狠,一套代码可以发布到各种微信、QQ、百度、头条小程序以及H5、安卓、IOS,牛逼的不要不要的,还有超级多好看的插件,完全拿来即用超级方便?
这么好的话打算小小的学一下,然后重构下我的连词小程序。
学习主要是看官方文档就可以啦,我这里只是大概介绍下我的学习流程而已,开始吧!
一、准备
视频教程:https://www.bilibili.com/video/BV1BJ411W7pX?p=3&spm_id_from=pageDriver
官网:https://uniapp.dcloud.io/
开发工具下载:https://www.dcloud.io/hbuilderx.html 这里下载App开发版
二、微信小程序运行故障
at Pipe.onStreamRead (internal/stream_base_commons.js:20
解决办法:https://blog.csdn.net/weixin_41700702/article/details/111187129
其实打开微信的安全服务端口就可以啦!
三、相关常用组件功能的学习
1、globalStyle
这个是全局配置,修改导航条等,配置路径为page.json中跟pages统计
"globalStyle": {"navigationBarTextStyle": "black","navigationBarTitleText": "uni-app",//导航条文字颜色"navigationBarBackgroundColor": "#eee",//导航条背景颜色"backgroundColor": "#F8F8F8" //背景颜色"enablePullDownRefresh": true},
相关配置的含义,官方文档有
2、tabBar
这个是配置底部的菜单,也有很多配置,跟globalStyle同级,下面是我的配置
"tabBar":{//"color":"#F0AD4E",//"selectedColor":"#007AFF",//"backgroundColor":"#4CD964",//"position":"top",//"borderStyle":"black","list":[{"pagePath":"pages/index/index","text":"炼词","iconPath":"static/images/syclose.png","selectedIconPath":"static/images/syopen.png"},{"pagePath":"pages/reply/reply","text":"复习","iconPath":"static/images/fx2close.png","selectedIconPath":"static/images/fx2open.png"},{"pagePath":"pages/record/record","text":"记录","iconPath":"static/images/wdclose.png","selectedIconPath":"static/images/wdopen.png"}]},
3、condition
有时候我们想要直接调试某一页面,不想要从首页点击进去,特别是微信小程序这种,那么加上condition可以让我们在编译模式那里可以选择。跟globalStyle同级,下面是我的配置
"condition":{"current": 0,"list":[{"name":"游戏页","path":"pages/play/play","query":"id=80"}]}
上面这个一般在开发环境使用,具体参考官方文档
4、text组件
组件学习比较简单,就类似一HTML的各种标签比如button,div,span等,直接参考官方文档即可
<view>我是复习</view><view><text selectable="true">唱歌,跳舞</text></view><view><text space="ensp">唱歌, 跳舞</text></view><view><text space="emsp">唱歌, 跳舞</text></view><view><text space="nbsp">唱歌, 跳舞</text></view><view><text>&</text></view><view><text decode="false">&</text></view>
5、view组件
<view class="box2" hover-class="box2-down"><view class="box1" hover-class="box1-down"hover-start-time="1000"hover-stay-time="1000"hover-stop-propagation="true">类似于HTML中的div</view>
6、button组件
<button>按钮</button><button size="mini">按钮</button><button type="primary">按钮</button><button plain="true">按钮</button><button disabled="true">按钮</button><button loading="true">按钮</button>
7、image组件
<image src="../../static/images/shezhi.png"></image><image src="https://www.suibibk.com/fileupload/images/202011/1605364293267.jpg"></image><image mode="aspectFill" src="https://www.suibibk.com/fileupload/images/202011/1605364293267.jpg"></image><image mode="aspectFit" src="https://www.suibibk.com/fileupload/images/202011/1605364293267.jpg"></image><image mode="scaleToFill" src="https://www.suibibk.com/fileupload/images/202011/1605364293267.jpg"></image><image mode="heightFix" src="https://www.suibibk.com/fileupload/images/202011/1605364293267.jpg"></image><image mode="widthFix" src="https://www.suibibk.com/fileupload/images/202011/1605364293267.jpg"></image>
8、样式
<style>.box1{width:100px;height:100px;background:red;}.box1-down{background:green;}.box2{width:200px;height:200px;background:black;}.box2-down{background:red;}</style>
还可以导入样式
play.css
view{color: #F0AD4E;font-size: 30rpx;}
然后导入
<style>@import url("./play.css");.box{width: 750rpx;height: 100rpx;background: red;font-size: 20rpx;}.box2{width: 375rpx;height: 100rpx;background: green;}</style>
9、数据绑定
{{}}v-bind:srcv-for
我们在
export default {data() {return {msg:'hello',flag: true,path: 'https://www.suibibk.com/fileupload/images/202011/1605364293267.jpg',arr: [{name: '小林1',age: 20,id: 1},{name: '小林2',age: 30,id: 2},{name: '小林3',age: 40,id: 3}]}}
定义了信息,图片路径,数组,然后在组件里这样做
<view class="box3">{{msg}}</view><view>{{1+'您好'}}</view><view>{{234+678}}</view><view>{{flag?'这是反话':"这是真的"}}</view><view><image v-bind:src="path"></image></view><view><image :src="path"></image></view><view v-for="(item,index) in arr" :key="item.id">名字:{{item.name}};年龄:{{item.age}}</view>
10、事件和传递参数
<button v-on:click="clickButton">点击</button><button v-on:click="clickButton2">点击获取事件对象</button><button v-on:click="clickButton3(10)">点击传递参数</button><button v-on:click="clickButton4(20,$event)">点击传递参数和获取事件对象</button>
然后我们在跟data()同级别定义methods
methods:{clickButton (){console.log("点击我了")},clickButton2 (e){console.log("点击我了:"+e)},clickButton3 (num){console.log("点击我了:"+num)},clickButton4 (num,e){console.log("点击我了:"+num+";"+e)}}
11、生命周期
跟methods同级,具体含义参考官方文档即可
onLoad: function(options) {console.log('页面加载:'+options.id)},onShow: function() {console.log('页面显示')},onHide: function() {console.log('页面隐藏')},onReady: function() {console.log('页面渲染完了')}
12、下拉刷新
先在pages.json开启下拉刷新
"pages": [...{"path": "pages/record/record","style": {"navigationBarTitleText": "记录","enablePullDownRefresh": true}},...]
enablePullDownRefresh为true,开启下拉刷新,下拉刷新后会触发下拉刷新的方法
onPullDownRefresh() {console.log("下拉刷新...")setTimeout(()=>{this.arr = ['D','E','F']//停止下拉刷新uni.stopPullDownRefresh()},2000)}
也可以点击按钮开启主动触发下拉刷新
<button @click="refresh()">手动下拉刷新</button>
点击后,触发下拉刷新
refresh (){uni.startPullDownRefresh()}
然后就会自动执行onPullDownRefresh方法。
13、监听页面滚动到底部的事件
"pages": [...{"path": "pages/record/record","style": {"navigationBarTitleText": "记录","onReachBottomDistance": 200}},...]
onReachBottomDistance表示距离底部多远就会触发滚动到底部的事件,默认是50,会触发如下方法
onReachBottom() {console.log("滚动到下一页了");this.arr=[...this.arr,...['1','2','3']]}
四、发送GET/POST请求
很简单,具体详细请查阅官网就可以啦
toPOST() {uni.request({url: "https://www.suibibk.com/getReplys",method: "POST",data:{id: "890369880069505024",visible: "1"},success(data) {console.log("请求返回结果:"+data)}})}
五、数据缓存
toStorage() {uni.setStorage({key: "id",data: {"name":"小美"},success: function() {console.log("保持数据成功")}})},toStorageSync() {uni.setStorageSync("id2",{"name":"小美2"})},getStorage() {uni.getStorage({key: "id",success:function(res) {console.log("异步获取数据成功:"+res.data.name)}})},getStorageSync() {const user = uni.getStorageSync("id2")console.log(user.name);},removeStorage() {uni.removeStorage({key: "id",success:function() {console.log("异步移除数据成功")}})},removeStorageSync() {uni.removeStorageSync("id2")console.log("移除数据成功")}
见名知意,包括同步和异步,正常同步比较方便
六、上传和预览图片
<view><button @click="chooseImg()">上传图片</button><!--下面这里是预览--><image v-for="img in imgArr" :src="img" @click="previewImg(img)"></image></view
用户点击上传,可以选多张,然后预览
export default {data() {return {title: 'Hello',imgArr: []}}}
这里先定义一个数组用来存放上传完后的路径
chooseImg() {console.log("上传图片")uni.chooseImage({count: 5,success: (res) => {this.imgArr = res.tempFilePathsconsole.log("imgArr:"+this.imgArr)}})}
这里设定了只能上传5张,但是在H5上是控制不住的,具体见官方文档…
七、条件编译,跨端兼容
因为我们是一套代码多端使用,总是会有些内容是不同平台个性化处理的,uni-app提供了#idef等方法来在view中,script中,style中做条件编译,如下
<!-- #ifdef H5 --><view>只会在H5上显示</view><!-- #endif --><!-- #ifdef MP-WEIXIN --><view>只会在微信小程序上显示</view><!-- #endif -->
onLoad() {//#ifdef H5console.log("只会在H5上初始化")//#endif//#ifdef MP-WEIXINconsole.log("只会在微信上初始化")//#endif}
/* #ifdef H5 */view {color: #007AFF;}/* #endif *//* #ifdef MP-WEIXIN */view {color: #FF0000;}/* #endif */
八、导航跳转
导航跳转有声明式和编程式,其实声明式就类似于HTML的a标签,uni-app中用的是navigator,具体见官方文档
<navigator url="/pages/play/play?id=80">跳转游戏页</navigator><navigator url="/pages/reply/reply" open-type="switchTab">跳转复习页</navigator><navigator url="/pages/play/play" open-type="redirect">跳转游戏页</navigator>
只有switchTab模式才能跳转tabBar类型的页面.
再来说说编程式
button @click="goPlay()">跳转到游戏页</button><button @click="goReply()">跳转复习页</button><button @click="goPlay2()">跳转到游戏页</button>
分别触发如下方法
goPlay(){uni.navigateTo({url:'/pages/play/play'})},goReply(){uni.switchTab({url:'/pages/reply/reply'})},goPlay2(){uni.redirectTo({url:'/pages/play/play'})}
九、跳转传参
其实很简单,直接在后面拼上就可以了
<navigator url="/pages/play/play?id=80">跳转游戏页</navigator>
然后在play页面的生命周期方法onLoad中获取就可以啦
onLoad: function(options) {console.log('页面加载:'+options.id)}
十、组件的创建使用和组件的生命周期
组件的创建也很简单,我们只需要建一个组件,如途中的test.vue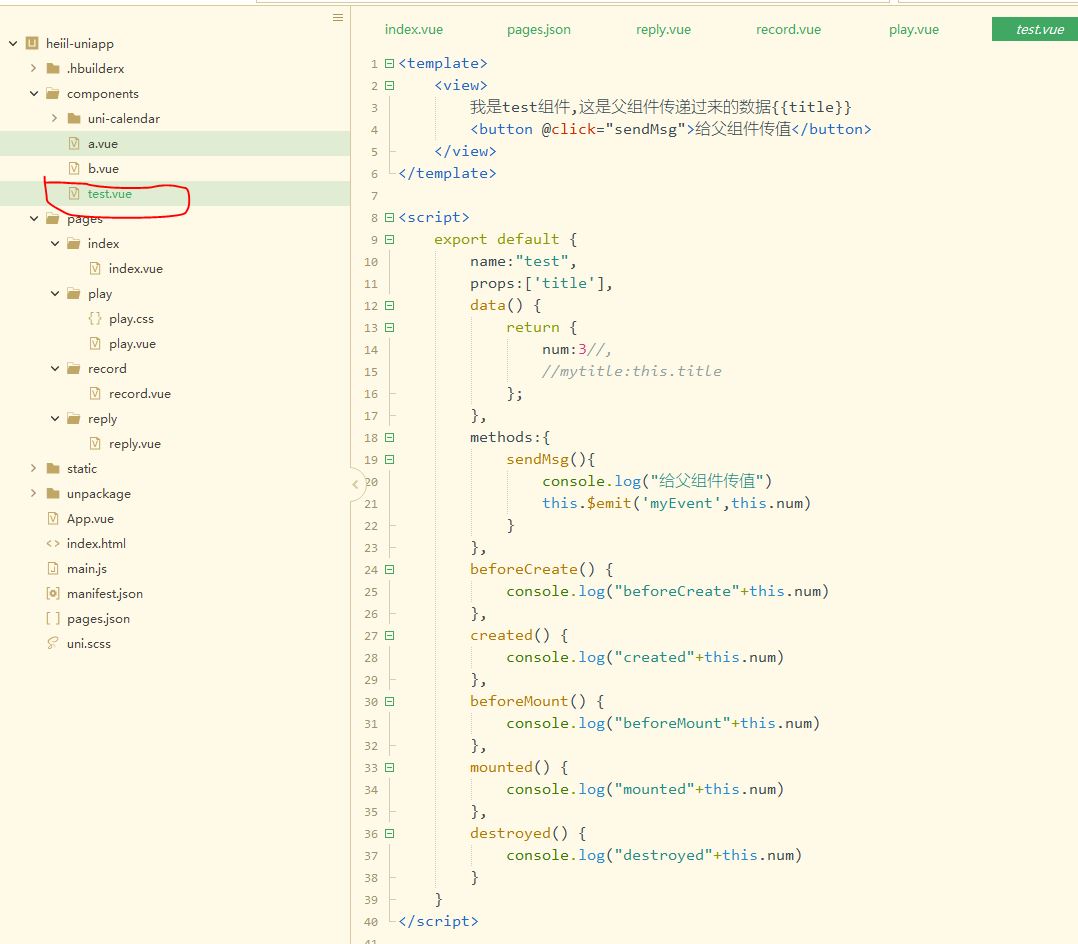
然后在要使用的页面的script中导入
import test from '../../components/test.vue'
注册到组件中
components:{test}
就可以跟view,button组件一样直接使用啦
<test></test>
十一、组件之间传递数据
我们可以自定义组件,那父组件和子组件怎么传递数据呢,正常来说,父组件是可以自动向子组件传递数据的,但是子组件却不能自动的,为啥呢?因为如果可以了的话,引用子组件的父组件该有多大的风险。
1、父传子
就比如上面,我们引入了子组件test.vue,那怎么向子组件test.vue传递数据呢?
很简单,具体详细请查阅官网就可以啦!
如在父组件中
<test :title="title"></test>
其中title是父组件的变量来的
data() {return {title: 'Hello'}}
那子组件test.vue要怎么获取title值呢?
export default {name:"test",props:['title']...}
只需要在子组件用props获取就可以啦
然后子组件就直接{{title}}就可以获取。
2、子传父
如果子组件想要向父组件传值,那么九只能定义方法,比如在子组件test.vue中
<button @click="sendMsg">给父组件传值</button>
定义sendMsg方法
methods:{sendMsg(){console.log("给父组件传值")this.$emit('myEvent',this.num)}}
这里用的是$emit来向父组件传值,父组件只需要定义myEvent方法就可以获取值了如
<test @myEvent="getMsg"></test>
那么会自动调用getMsg方法
getMsg(num){console.log("获取子组件的传值:"+num)}
3、兄弟组件互传
兄弟组件的互相传值,有点类似发布订阅的模式,比如我们再建立两个组件
components/a.vue
<template><view><button @click="addNum">a组件修改b组件的数据</button></view></template>
components/b.vue
<template><view>b组件的数据{{num}}</view></template>
都在父组件中引用
import test from '../../components/test.vue'import testA from '../../components/a.vue'import testB from '../../components/b.vue'...components:{test,"test-a": testA,"test-b": testB}
<test-a></test-a><test-b></test-b>
那怎样实现点击a组件里面的按钮,传值到兄弟组件b呢?
很简单,我们在b.vue注册个监听事件
export default {name:"b",data() {return {num:0};},created() {//注册个监听事件uni.$on('updateNum',num=>{console.log("b组件监听到了")this.num+=num})}}
这里用的是$on,然后只要有updateNum事件就会被触发,然后我们在a组件中
export default {name:"a",data() {return {};},methods:{addNum(){console.log("修改b组件的值")uni.$emit('updateNum',10)}}}
用uni.$emit('updateNum',10)来发布事件就好啦!
具体参考官方文档!
十二、uni-ui组件库的使用
比如我们要使用一个日期组件,uni-calendar,然后我们只需要加到compontents目录下就可以啦,因为uni-calendar组件符合easycom规范,HBuilderX 2.5.5起,只需将本组件导入项目,在页面template中即可直接使用,无需在页面中import和注册components。
我们直接使用
<uni-calendar:insert="true":lunar="true":start-date="'2019-3-2'":end-date="'2019-5-20'"@change="change"/>
完美!
十二、总结
以官方文档为主,毕竟技术更新太快啦!
