


经过比较简单的步骤,终于把源码环境搭建好了,现在来简单的阅读下源码。
背景
我们知道,Tomcat就类似相当于一个Socket服务器,二浏览器就相当于一个客户端,浏览器请求链接,相当于发起了Socket请求,只不过是按HTTP协议来封装数据,然后Tomcat服务器接收到Socket连接后,解析数据然后返回。这里我就稍微看下源码Tomcat怎么做到的。
我在这篇文章
https://www.suibibk.com/topic/946547582480416768
中知道,Tomcat数据的流转大概是下面的流转模式模式
1、Tomcat中有一个叫做Endpoint的接口,抽象实现类是 AbstractEndpoint,具体子类在 NioEndpoint 和 Nio2Endpoint,其中两个重要组件:Acceptor 和 SocketProcessor。
2、其中Acceptor 用于监听 Socket 连接请求,SocketProcessor 用于处理收到的 Socket 请求,提交到线程池 Executor 处理。
3、然后Tomcat中还有一个Processor
- 接收 Endpoint 的 socket,读取字节流解析成 tomcat request 和 response,通过 adapter 将其提交到容器处理。Processor 的具体实现类 AjpProcessor、Http11Processor 实现了特定协议的解析方法和请求处理方式。
- 4、ProtocolHandler 接口负责解析请求生成 tomcat requst,CoyoteAdapter 的 service 方法,将 Tomcat Request 对象,转成 ServletRequest,再调用 service 方法。
如下图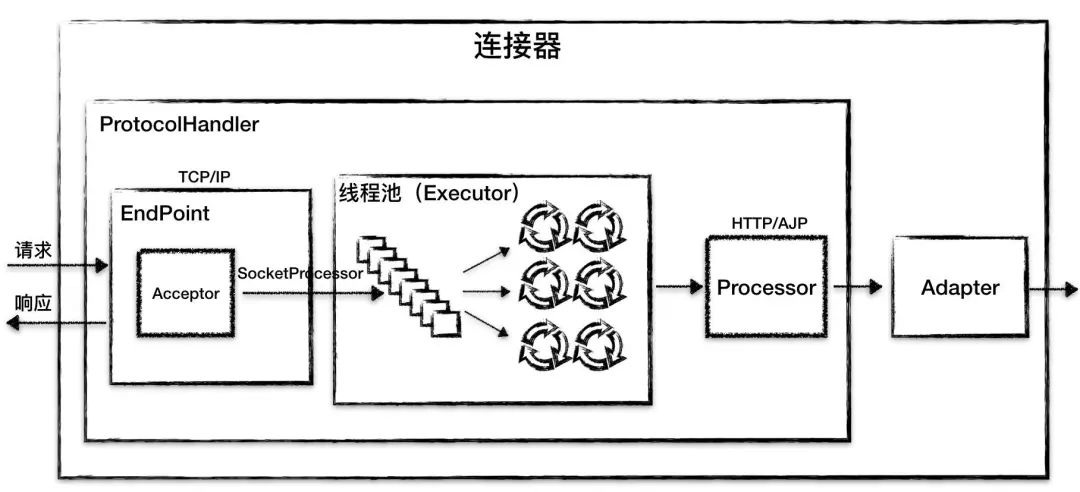
5、然后数据就到了容器,容器通过 Pipeline-Valve 责任链,对请求一次处理,invoke 处理方法,每个容器都有一个 Pipeline,触发第一个 Valve,这个容器的 valve 都会被调到,不同容器之间通过 Pipeline 的 getBasic 方法,负责调用下层容器的第一个 Valve。
6.整个调用连由连接器中的 adapter 触发,调用 engine 中的第一个 Valve。
wrapper 容器的最后一个 valve 创建一个 filter 链,并调用 doFilter 方法,最终会调用到 servlet 的 service 方法。
如下图

也就是我们大概到看如下代码
- 1、NioEndpoint,里面应该有两个组件Acceptor和SocketProcessor
- 2、Http11Processor、CoyoteAdapter
- 3、各种valve(阀门),大概看了下源码目录发现在org.apache.catalina.core下面有StandardEngineValve、StandardHostValve、StandardContextValve、StandardWrapperValve
- 4、还有我们是直接请求tomcat的8080,所以默认会用JSP的servlet:JspServlet
顺便说下,Engine下面有多个Host,也就是说有多个虚拟主机,可以配置多个域名,然后每个Host下面有多个Context,也就是一个域名下面有多个应用,然后Context下面有多个Wrapper,其实Wrapper就是包装了Servlet。
源码调试
那我们来调试代码看看是否是如此如此吧。
1、因为我们是用HTTP来请求的,所以我们先在NioEndpoint类来打断点,具体NioEndpoint的内部类Accept的run方法处打断点,按上面的步骤Acceptor 用于监听 Socket 连接请求,SocketProcessor 用于处理收到的 Socket 请求,提交到线程池 Executor 处理。
org.apache.tomcat.util.net.NioEndpoint 514行
protected class Acceptor extends AbstractEndpoint.Acceptor {@Overridepublic void run() {...// Configure the socketif (running && !paused) {// setSocketOptions() will hand the socket off to// an appropriate processor if successfulif (!setSocketOptions(socket)) {closeSocket(socket);}}...}...}
发现断点执行到了
setSocketOptions(socket)
然后代码走到了同一个类的
protected boolean setSocketOptions(SocketChannel socket) {// Process the connectiontry {//disable blocking, APR style, we are gonna be polling itsocket.configureBlocking(false);Socket sock = socket.socket();socketProperties.setProperties(sock);NioChannel channel = nioChannels.pop();if (channel == null) {SocketBufferHandler bufhandler = new SocketBufferHandler(socketProperties.getAppReadBufSize(),socketProperties.getAppWriteBufSize(),socketProperties.getDirectBuffer());if (isSSLEnabled()) {channel = new SecureNioChannel(socket, bufhandler, selectorPool, this);} else {channel = new NioChannel(socket, bufhandler);}} else {channel.setIOChannel(socket);channel.reset();}//关键代码getPoller0().register(channel);} catch (Throwable t) {ExceptionUtils.handleThrowable(t);try {log.error("",t);} catch (Throwable tt) {ExceptionUtils.handleThrowable(tt);}// Tell to close the socketreturn false;}return true;}
方法,看上面的关键代码
getPoller0().register(channel);
这里的Poller我们点进去会发现实现了一个 Runnable接口,那肯定是跟线程有关的啦
public class Poller implements Runnable
这里说一句Poller也是NioEndpoint的内部类,而参数channel我们学过NIO的应该都知道,存放数据的的地方而已,具体不过多的论述。那调试发现下一步骤运行到Poller的run方法
@Overridepublic void run() {...if (socketWrapper != null) {//在这里打断点processKey(sk, socketWrapper);}...}
到processKey方法
protected void processKey(SelectionKey sk, NioSocketWrapper attachment) {...if (sk.isReadable()) {if (!processSocket(attachment, SocketEvent.OPEN_READ, true)) {closeSocket = true;}}...
然后到:processSocket(attachment, SocketEvent.OPEN_READ, true)方法。
public boolean processSocket(SocketWrapperBase<S> socketWrapper,SocketEvent event, boolean dispatch) {try {if (socketWrapper == null) {return false;}SocketProcessorBase<S> sc = processorCache.pop();if (sc == null) {sc = createSocketProcessor(socketWrapper, event);} else {sc.reset(socketWrapper, event);}Executor executor = getExecutor();if (dispatch && executor != null) {//到这里断点,调试发现sc的对象executor.execute(sc);} else {sc.run();}} catch (RejectedExecutionException ree) {getLog().warn(sm.getString("endpoint.executor.fail", socketWrapper) , ree);return false;} catch (Throwable t) {ExceptionUtils.handleThrowable(t);// This means we got an OOM or similar creating a thread, or that// the pool and its queue are fullgetLog().error(sm.getString("endpoint.process.fail"), t);return false;}return true;}
调试发现sc属于对象
org.apache.tomcat.util.net.NioEndpoint$SocketProcessor
我们终于到了SocketProcessor类,也证明了说法Acceptor 用于监听 Socket 连接请求,SocketProcessor 用于处理收到的 Socket 请求,提交到线程池 Executor 处理的正确性
我们继续调试下去进入SocketProcessor的doRun方法,其实这个是父类的run方法里面调用duRun,所以线程最终会调用这个方法。
@Overrideprotected void doRun() {...if (event == null) {state = getHandler().process(socketWrapper, SocketEvent.OPEN_READ);} else {//接着会执行这个方法state = getHandler().process(socketWrapper, event);}...}
这个getHandler().process方法属于AbstractProtocol的方法,继续调试进去
@Overridepublic SocketState process(SocketWrapperBase<S> wrapper, SocketEvent status) {...if (processor == null) {//这里会返回Http11Processor方法processor = recycledProcessors.pop();if (getLog().isDebugEnabled()) {getLog().debug(sm.getString("abstractConnectionHandler.processorPop", processor));}}...//执行这个方法state = processor.process(wrapper, status);...}
会进到这个超长的方法,在这里
//这里会返回Http11Processor方法processor = recycledProcessors.pop();
终于返回了我们步骤中的Http11Processor,也就是对应之前的图的Processor,也就是说准备读取字节流解析成 tomcat request 和 response,通过 adapter 将其提交到容器处理。Processor 的具体实现类 AjpProcessor、Http11Processor 实现了特定协议的解析方法和请求处理方式。
继续跟进进去
@Overridepublic SocketState process(SocketWrapperBase<?> socketWrapper, SocketEvent status)throws IOException {...state = service(socketWrapper);...}
然后继续就到了我们的Http11Processor#service方法.贼长
@Overridepublic SocketState service(SocketWrapperBase<?> socketWrapper)throws IOException {RequestInfo rp = request.getRequestProcessor();rp.setStage(org.apache.coyote.Constants.STAGE_PARSE);// Setting up the I/OsetSocketWrapper(socketWrapper);// FlagskeepAlive = true;openSocket = false;readComplete = true;boolean keptAlive = false;SendfileState sendfileState = SendfileState.DONE;while (!getErrorState().isError() && keepAlive && !isAsync() && upgradeToken == null &&sendfileState == SendfileState.DONE && !endpoint.isPaused()) {// Parsing the request headertry {if (!inputBuffer.parseRequestLine(keptAlive)) {if (inputBuffer.getParsingRequestLinePhase() == -1) {return SocketState.UPGRADING;} else if (handleIncompleteRequestLineRead()) {break;}}// Process the Protocol component of the request line// Need to know if this is an HTTP 0.9 request before trying to// parse headers.//解析使用的协议,这里发现是HTTP1.1prepareRequestProtocol();...//对请求进行解析prepareRequest();...// 这里的getAdapter获取的就是CoyoteAdaptergetAdapter().service(request, response);...
其中 prepareRequestProtocol();的作用的解析使用的协议
private void prepareRequestProtocol() {MessageBytes protocolMB = request.protocol();if (protocolMB.equals(Constants.HTTP_11)) {http09 = false;http11 = true;protocolMB.setString(Constants.HTTP_11);} else if (protocolMB.equals(Constants.HTTP_10)) {http09 = false;http11 = false;keepAlive = false;protocolMB.setString(Constants.HTTP_10);} else if (protocolMB.equals("")) {// HTTP/0.9http09 = true;http11 = false;keepAlive = false;} else {// Unsupported protocolhttp09 = false;http11 = false;// Send 505; Unsupported HTTP versionresponse.setStatus(505);setErrorState(ErrorState.CLOSE_CLEAN, null);if (log.isDebugEnabled()) {log.debug(sm.getString("http11processor.request.prepare")+" Unsupported HTTP version \""+protocolMB+"\"");}}}
我们可以看到prepareRequest()方法
/*** After reading the request headers, we have to setup the request filters.*/private void prepareRequest() throws IOException {//设置httpif (endpoint.isSSLEnabled()) {request.scheme().setString("https");}...// Input filter setupprepareInputFilters(headers);//设置host和端口等// Validate host name and extract port if presentparseHost(hostValueMB);if (!getErrorState().isIoAllowed()) {getAdapter().log(request, response, 0);}}
我们继续看代码发现
getAdapter().service(request, response);
这里的 getAdapter()就是CoyoteAdapter ,这样就跟之前的步骤对上了:Endpoint 接收到 socket 连接后,生成一个 socketProcessor 交给线程池处理,run 方法会调用 Processor 解析应用层协议,生成 tomcat request 后,调用 adapter 的 service 方法。那么接下来应该就要开始交给容器处理了。
@Overridepublic void service(org.apache.coyote.Request req, org.apache.coyote.Response res)throws Exception {//获取请求Request request = (Request) req.getNote(ADAPTER_NOTES);Response response = (Response) res.getNote(ADAPTER_NOTES);...try {// Parse and set Catalina and configuration specific// request parameters//解析postParseSuccess = postParseRequest(req, request, res, ...//这里是关键代码connector.getService().getContainer().getPipeline().getFirst().invoke(request, response);}...}}
之前的步骤说整个容器的调用链由连接器中的 adapter 触发,调用 engine 中的第一个 Valve。就是下面的代码
connector.getService().getContainer().getPipeline().getFirst().invoke(request, response);
- 上面的getService()是StandardService
- 上面的getContainer()是StandardEngine
- 上面的getPipeline()是StandardEngine的Pipeline,Pipeline里面有很多阀门(valve)。
- 上面的getFirst()是第一个阀门org.apache.catalina.core.StandardEngineValve[Catalina]
- 。
这样我们就成功进入到了invoke
final class StandardEngineValve extends ValveBase{@Overridepublic final void invoke(Request request, Response response)throws IOException, ServletException {// Select the Host to be used for this Request//获取虚拟主机Host host = request.getHost();if (host == null) {// HTTP 0.9 or HTTP 1.0 request without a host when no default host// is defined.// Don't overwrite an existing errorif (!response.isError()) {response.sendError(404);}return;}if (request.isAsyncSupported()) {request.setAsyncSupported(host.getPipeline().isAsyncSupported());}// 调用host的第一个阀门的invokehost.getPipeline().getFirst().invoke(request, response);}
继续走
// 调用host的第一个阀门的invokehost.getPipeline().getFirst().invoke(request, response);
final class StandardHostValve extends ValveBase {@Overridepublic final void invoke(Request request, Response response)throws IOException, ServletException {// Select the Context to be used for this Request//找到ContextContext context = request.getContext();...context.getPipeline().getFirst().invoke(request, response);...}}
就跟图中描述的一样。继续
final class StandardContextValve extends ValveBase {@Overridepublic final void invoke(Request request, Response response)throws IOException, ServletException {// Disallow any direct access to resources under WEB-INF or META-INF//这里是/index.jspMessageBytes requestPathMB = request.getRequestPathMB();if ((requestPathMB.startsWithIgnoreCase("/META-INF/", 0))|| (requestPathMB.equalsIgnoreCase("/META-INF"))|| (requestPathMB.startsWithIgnoreCase("/WEB-INF/", 0))|| (requestPathMB.equalsIgnoreCase("/WEB-INF"))) {response.sendError(HttpServletResponse.SC_NOT_FOUND);return;}// Select the Wrapper to be used for this RequestWrapper wrapper = request.getWrapper();if (wrapper == null || wrapper.isUnavailable()) {response.sendError(HttpServletResponse.SC_NOT_FOUND);return;}// Acknowledge the requesttry {response.sendAcknowledgement(ContinueResponseTiming.IMMEDIATELY);} catch (IOException ioe) {container.getLogger().error(sm.getString("standardContextValve.acknowledgeException"), ioe);request.setAttribute(RequestDispatcher.ERROR_EXCEPTION, ioe);response.sendError(HttpServletResponse.SC_INTERNAL_SERVER_ERROR);return;}if (request.isAsyncSupported()) {request.setAsyncSupported(wrapper.getPipeline().isAsyncSupported());}//找Wrapperwrapper.getPipeline().getFirst().invoke(request, response);}}
这里到达最后一个valve
wrapper.getPipeline().getFirst().invoke(request, response);
final class StandardWrapperValve extends ValveBase {@Overridepublic final void invoke(Request request, Response response)throws IOException, ServletException {...try {if (!unavailable) {//wrapper是对servlet的包装servlet = wrapper.allocate();}} catch (UnavailableException e) {...filterChain.doFilter(request.getRequest(), response.getResponse());...}}}
servlet = wrapper.allocate();
返回的是
org.apache.jasper.servlet.JspServlet@69afd737
我们已经进行到了步骤中的最后:wrapper 容器的最后一个 valve 创建一个 filter 链,并调用 doFilter 方法,最终会调用到 servlet 的 service 方法。
上面的doFilter会进入
public final class ApplicationFilterChain implements FilterChain {@Overridepublic void doFilter(ServletRequest request, ServletResponse response)throws IOException, ServletException {...internalDoFilter(request,response);...}}}
然后到 internalDoFilter(request,response);
private void internalDoFilter(ServletRequest request,ServletResponse response)throws IOException, ServletException {...servlet.service(request, response);...}
filter结束后终于到了
servlet.service(request, response);
这个servlet就是:org.apache.jasper.servlet.JspServlet
如果是我们自己写的servlet,那么调用的就是我们自己写的servlet的service方法
public class JspServlet extends HttpServlet implements PeriodicEventListener {@Overridepublic void service (HttpServletRequest request, HttpServletResponse response)throws ServletException, IOException {// jspFile may be configured as an init-param for this servlet instanceString jspUri = jspFile;if (jspUri == null) {/** Check to see if the requested JSP has been the target of a* RequestDispatcher.include()*/jspUri = (String) request.getAttribute(RequestDispatcher.INCLUDE_SERVLET_PATH);if (jspUri != null) {/** Requested JSP has been target of* RequestDispatcher.include(). Its path is assembled from the* relevant javax.servlet.include.* request attributes*/String pathInfo = (String) request.getAttribute(RequestDispatcher.INCLUDE_PATH_INFO);if (pathInfo != null) {jspUri += pathInfo;}} else {/** Requested JSP has not been the target of a* RequestDispatcher.include(). Reconstruct its path from the* request's getServletPath() and getPathInfo()*/jspUri = request.getServletPath();String pathInfo = request.getPathInfo();if (pathInfo != null) {jspUri += pathInfo;}}}if (log.isDebugEnabled()) {log.debug("JspEngine --> " + jspUri);log.debug("\t ServletPath: " + request.getServletPath());log.debug("\t PathInfo: " + request.getPathInfo());log.debug("\t RealPath: " + context.getRealPath(jspUri));log.debug("\t RequestURI: " + request.getRequestURI());log.debug("\t QueryString: " + request.getQueryString());}try {boolean precompile = preCompile(request);serviceJspFile(request, response, jspUri, precompile);} catch (RuntimeException | IOException | ServletException e) {throw e;} catch (Throwable e) {ExceptionUtils.handleThrowable(e);throw new ServletException(e);}}}
也就会返回一个流到浏览器这个客户端,页面就可以正常呈现了。
总结
果然根据前人总结出来的步骤看源码就是轻松,但是如果要自己从源码总结出这写步骤来,那就应该很困难了,不过相信肯定是对Tomcat有比较深入的了解了才回去看源码。
这一篇文章只是粗略的过了一遍一小部分代码,并没有过什么启动啊,socket啊等代码,如果是这些代码,那么得从启动类Bootstrap的main开始啦。
tomcat已经这么多年了,如果要做到全部源码都熟悉,那基本不可能,也没有必要,相关源码好好研究学习下就可以了。
以后再具体源码具体分析,比如session什么的。
