


1、初始化ReentrantLock锁
ReentrantLock lock = new ReentrantLock(true);
我们可以查看ReentrantLock的构造方法
public ReentrantLock(boolean fair) {sync = fair ? new FairSync() : new NonfairSync();}
因为fair传的是true,所以这里新建的是FairSync公平锁。
2、加锁
ReentrantLock的加锁调用的是如下方法
lock.lock();
跟踪进去
@Overridepublic void lock() {aboutToAcquire(this);try {super.lock();} finally {lockStateChanged(this);}}
这里先不看 aboutToAcquire(this);和 lockStateChanged(this);先,直接先找主线剧情!super.lock();
public void lock() {sync.lock();}
我们知道在初始化阶段实例化的是公平锁FairSync,所以继续走FairSync#lock方法
final void lock() {acquire(1);}
然后调用AbstractQueuedSynchronizer#acquire方法获得锁
public final void acquire(int arg) {if (!tryAcquire(arg) &&acquireQueued(addWaiter(Node.EXCLUSIVE), arg))selfInterrupt();}
这里我们先看ReentrantLock#tryAcquire(arg),arg为1,单词字面意思为尝试获得,也就是调用这个方法尝试获得锁。
protected final boolean tryAcquire(int acquires) {//1、获取当前线程final Thread current = Thread.currentThread();//2、获取状态值int c = getState();if (c == 0) {if (!hasQueuedPredecessors() &&compareAndSetState(0, acquires)) {setExclusiveOwnerThread(current);return true;}}else if (current == getExclusiveOwnerThread()) {int nextc = c + acquires;if (nextc < 0)throw new Error("Maximum lock count exceeded");setState(nextc);return true;}return false;}
假设现在是第一个线程进来,那么此时c的值为0,也就是AbstractQueuedSynchronizer#state=0
那么会进入到下面这段逻辑:
if (!hasQueuedPredecessors() &&compareAndSetState(0, acquires)) {setExclusiveOwnerThread(current);return true;}
我们先看也就是AbstractQueuedSynchronizer#hasQueuedPredecessors(),通过字面意思,我们可以大概推测作用为判断队列中有没有等带获取锁的线程,代码如下:
public final boolean hasQueuedPredecessors() {// The correctness of this depends on head being initialized// before tail and on head.next being accurate if the current// thread is first in queue.Node t = tail; // Read fields in reverse initialization orderNode h = head;Node s;return h != t &&((s = h.next) == null || s.thread != Thread.currentThread());}
上面假设这里是第一个线程,所以此时tail和head都是null,所以h != t则为false,那么下面这段逻辑
return h != t &&((s = h.next) == null || s.thread != Thread.currentThread());
返回的是false。这个方法返回false,表明!hasQueuedPredecessors()为true,那么会执行 compareAndSetState(0, acquires)方法,该方法执行逻辑如下:
protected final boolean compareAndSetState(int expect, int update) {// See below for intrinsics setup to support thisreturn unsafe.compareAndSwapInt(this, stateOffset, expect, update);}
可以看到是调用了魔术类Unsafe的原子交换方法compareAndSwapInt,具体交换逻辑这里不提,涉及到CAS和一些底层的原子操作逻辑。
如果交换成功则返回true,那么ReentrantLock#tryAcquire方法将会返回true.也就是这段逻辑
public final void acquire(int arg) {if (!tryAcquire(arg) &&acquireQueued(addWaiter(Node.EXCLUSIVE), arg))selfInterrupt();}
!tryAcquire(arg)将为false,线程继续执行,拿到了锁。假设此时第二个线程进来,那么因为c此时已经等于1,所以tryAcquire(arg)会返回false,那么!tryAcquire(arg)将为true那么将会进入acquireQueued(addWaiter(Node.EXCLUSIVE), arg)判断逻辑,我们先看addWaiter(Node.EXCLUSIVE):
private Node addWaiter(Node mode) {//初始化一个节点Node node = new Node(Thread.currentThread(), mode);// Try the fast path of enq; backup to full enq on failureNode pred = tail;if (pred != null) {node.prev = pred;if (compareAndSetTail(pred, node)) {pred.next = node;return node;}}enq(node);return node;}
modec传的是Node.EXCLUSIVE,从字面意思可以知道,是个排它锁。此时因才第二个线程进来,所以此时tail=null,pred=tail=null,所以会进入到enq(node)方法。
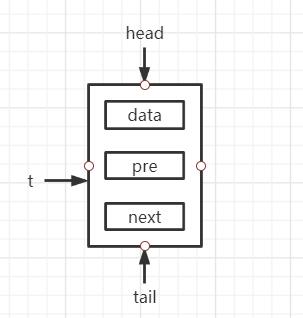
private Node enq(final Node node) {for (;;) {Node t = tail;//如果尾节点为空if (t == null) { // Must initialize//CAS初始化头节点if (compareAndSetHead(new Node()))//尾节的指向头节点tail = head;} else {//当前节点的前驱指向尾节点,也就是把当前节点加在最后。node.prev = t;//通过CAS把node设置到tailif (compareAndSetTail(t, node)) {t.next = node;return t;}}}}
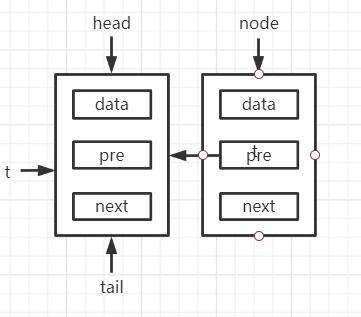
在AQS中,我们进程会看到死循环for和CAS操作,也就是自旋CAS来实现原子操作,第一个if里面的逻辑是相当于初始化队列,也就是初始化一个节点Node,head和tail引用(指针)都指向它。else逻辑中的意思是队列不为空,则通过CAS把node设置到tail。这段逻辑可能有点难想象,这里我画一个图。
node.prev = t
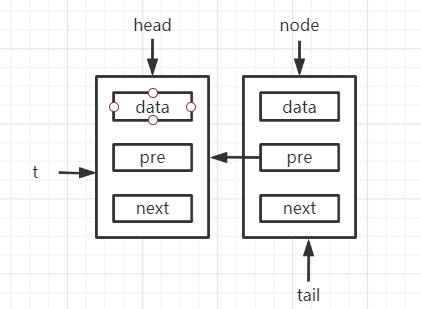
compareAndSetTail(t, node)
t.next = node;
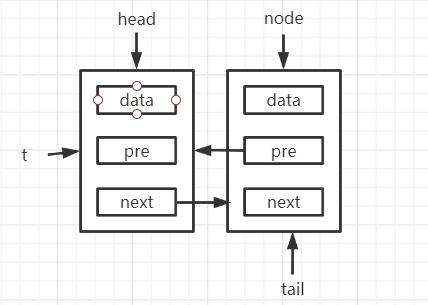
而如果pred不为空,则走这段逻辑
if (pred != null) {node.prev = pred;if (compareAndSetTail(pred, node)) {pred.next = node;return node;}}
按上图的模式分析,结果是一样的,就是把新节点加到最后。
然后addWaiter就会返回新的Node。
然后我们来看方法acquireQueued(addWaiter(Node.EXCLUSIVE), arg));此时addWaiter(Node.EXCLUSIVE)返回node,所以就变为了acquireQueued(node, arg));逻辑如下
final boolean acquireQueued(final Node node, int arg) {boolean failed = true;try {boolean interrupted = false;for (;;) {//final Node p = node.predecessor();if (p == head && tryAcquire(arg)) {setHead(node);p.next = null; // help GCfailed = false;return interrupted;}if (shouldParkAfterFailedAcquire(p, node) &&parkAndCheckInterrupt())interrupted = true;}} finally {if (failed)cancelAcquire(node);}}
这里又是自旋CAS,我们先看addWaiter
final Node predecessor() throws NullPointerException {Node p = prev;if (p == null)throw new NullPointerException();elsereturn p;}
在上面,我们知道p为head,那么这里又重新尝试tryAcquire(arg)获取锁,淡然这里还是返回false,因为第一个线程还在持有锁,那么会走到下面这个方法shouldParkAfterFailedAcquire(p, node)
private static boolean shouldParkAfterFailedAcquire(Node pred, Node node) {int ws = pred.waitStatus;if (ws == Node.SIGNAL)/** This node has already set status asking a release* to signal it, so it can safely park.*/return true;if (ws > 0) {/** Predecessor was cancelled. Skip over predecessors and* indicate retry.*/do {node.prev = pred = pred.prev;} while (pred.waitStatus > 0);pred.next = node;} else {/** waitStatus must be 0 or PROPAGATE. Indicate that we* need a signal, but don't park yet. Caller will need to* retry to make sure it cannot acquire before parking.*/compareAndSetWaitStatus(pred, ws, Node.SIGNAL);}return false;}
我们知道pred此时为head,而head只是单纯的new Node,所以waitStatus为0,那么会走到compareAndSetWaitStatus(pred, ws, Node.SIGNAL);waitStatus设置为 Node.SIGNAL然后return false;也就是shouldParkAfterFailedAcquire(p, node)为false,那么继续自旋下一个循环,再进入上面的方法后ws就为Node.SIGNAL,所以return true,此时shouldParkAfterFailedAcquire(p, node)为true.那么逻辑:
if (shouldParkAfterFailedAcquire(p, node) &&parkAndCheckInterrupt())interrupted = true;
就会走到第二个判断 parkAndCheckInterrupt()通过名字就大概知道,应该是阻塞线程。
private final boolean parkAndCheckInterrupt() {LockSupport.park(this);return Thread.interrupted();}
public static void park(Object blocker) {Thread t = Thread.currentThread();setBlocker(t, blocker);UNSAFE.park(false, 0L);setBlocker(t, null);}
果然最后调用了UNSAFE.park(false, 0L);该方法会调用操作系统api来阻塞线程。那么线程就阻塞在了这段代码,等待被唤醒后继续下一次循环tryAcquire(arg)尝试获取锁,如果获取到锁则方法返回,程序继续执行,否在继续阻塞!
好了,加锁的源码逻辑到这里就结束了,这里只抽取了主线,大概总结下。
1、线程尝试获取锁
2、获取锁失败则加入等待队列
3、调用Unsafe.park阻塞
关键点是自旋CAS(for(;;)+CAS)。
3、解锁
看完了加锁的源码,我们来看下解锁的源码,解锁首先从下面的代码开始
lock.unlock();
然后跟踪进去:
public void unlock() {sync.release(1);}
这些通过加锁后,源码跟踪比较简单,再跟踪进去
public final boolean release(int arg) {if (tryRelease(arg)) {Node h = head;if (h != null && h.waitStatus != 0)unparkSuccessor(h);return true;}return false;}
我们先看tryRelease方法,尝试去释放
protected final boolean tryRelease(int releases) {int c = getState() - releases;if (Thread.currentThread() != getExclusiveOwnerThread())throw new IllegalMonitorStateException();boolean free = false;if (c == 0) {free = true;setExclusiveOwnerThread(null);}setState(c);return free;}
很明显现在是持有锁的线程去释放,c为0,那么free就为true,则该方法返回tue,若该方法返回ture,则接下来将执行这段逻辑
Node h = head;if (h != null && h.waitStatus != 0)unparkSuccessor(h);return true;
在加锁的后面部分我们把waitStatus设置为Node.SIGNAL,而SIGNAL对应的值是-1,所以会执行逻辑unparkSuccessor(h);
private void unparkSuccessor(Node node) {/** If status is negative (i.e., possibly needing signal) try* to clear in anticipation of signalling. It is OK if this* fails or if status is changed by waiting thread.*/int ws = node.waitStatus;if (ws < 0)compareAndSetWaitStatus(node, ws, 0);/** Thread to unpark is held in successor, which is normally* just the next node. But if cancelled or apparently null,* traverse backwards from tail to find the actual* non-cancelled successor.*/Node s = node.next;if (s == null || s.waitStatus > 0) {s = null;for (Node t = tail; t != null && t != node; t = t.prev)if (t.waitStatus <= 0)s = t;}if (s != null)LockSupport.unpark(s.thread);}
这个方法传的是head头节点,所以开始head头节点的waitStatus为-1小于0,所以自旋重新设置为0,这个相当于初始化为0,好让第二个线程继续走前面走过的逻辑。然后node.next;获取下一个节点,这个节点从上面的分析来说是不为空的,所以最后会执行下面的逻辑:
LockSupport.unpark(s.thread);
public static void unpark(Thread thread) {if (thread != null)UNSAFE.unpark(thread);}
这里是调用Unsafe魔术类重新唤醒线程。到这里就解锁成功了,唤醒线程后,我们可以回到线程阻塞的逻辑:
```final boolean acquireQueued(final Node node, int arg) {boolean failed = true;try {boolean interrupted = false;for (;;) {//final Node p = node.predecessor();if (p == head && tryAcquire(arg)) {setHead(node);p.next = null; // help GCfailed = false;return interrupted;}if (shouldParkAfterFailedAcquire(p, node) &&parkAndCheckInterrupt())interrupted = true;}} finally {if (failed)cancelAcquire(node);}}
可以知道之前在这个方法被阻塞parkAndCheckInterrupt(),现在被唤醒了,继续执行for循环,重新尝试获得锁,如果获取失败又会被阻塞。
到这里解锁的源码页走了一波!
