


在上一篇文章中,我们分析了SpringIOC基于配置文件方式的启动源码分析,以及单例bean的初始化过程,这一片文章我们来看看SpringIOC基于注解方式的启动过程,其实主要区别就是一个解析配置文件获得BeanDefinition一个是按注解扫描包获得BeanDefinition,后面的实例化过程是一样的了,所以这篇文章也只是分析到获得BeanDefinition.
SpringIOC 初始化过程–Bean容器的创建过程(基于AnnotationConfigApplicationContext方式)
这里写一个启动Spring容器的例子
IndexDao
public interface IndexDao {String testSource();}
IndexDaoImpl
@Servicepublic class IndexDaoImpl implements IndexDao {public IndexDaoImpl() {System.out.println("constructor");}public String testSource(){return "test \n test2";}}
AppConfig
@Configuration@ComponentScan("cn.haoxy")public class AppConfig {}
TestBean
public class TestBean {public static void main(String[] args) {AnnotationConfigApplicationContext applicationContext = new AnnotationConfigApplicationContext();applicationContext.register(AppConfig.class);applicationContext.refresh();IndexDao bean = applicationContext.getBean(IndexDao.class);System.out.println(bean.testSource());applicationContext.close();}}
在Maven构建项目时引入的
<dependency><groupId>org.springframework</groupId><artifactId>spring-context</artifactId><version>5.0.11.RELEASE</version></dependency>
在看关于spring源码的文章时很多都是基于 ClassPathXmlApplicationContext(…) 现在都基于springboot项目很少再使用xml的方式去配置,现在很多都是基于注解的方式; 所以本文我们使用AnnotationConfigApplicationContext();来进行讲解;
当然,除了这两个以外我们也还有其他构建 ApplicationContext 的方案可供选择:
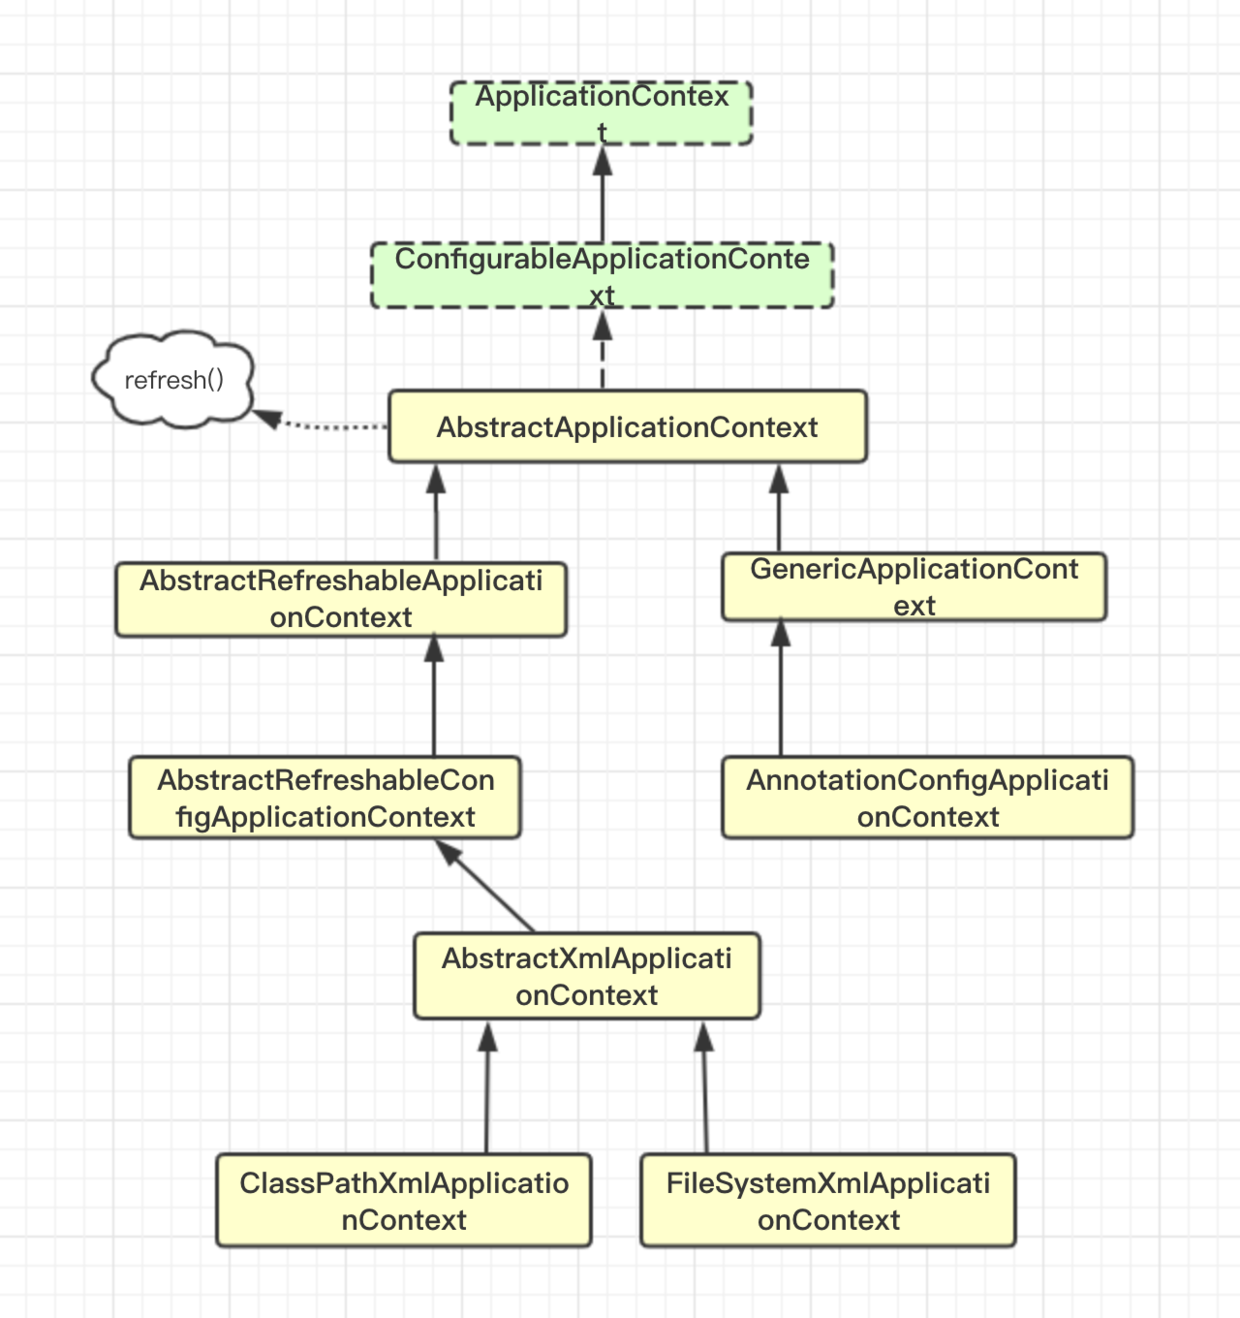
FileSystemXmlApplicationContext: 的构造函数需要一个 xml 配置文件在系统中的路径,其他和 ClassPathXmlApplicationContext 基本上一样。
对于上面的类我们先混个眼熟就行;后面我们会再说到的;
启动过程分析
AnnotationConfigApplicationContext();方法介绍
第一步: 我们肯定要从AnnotationConfigApplicationContext的构造方法开始说起;
AnnotationConfigApplicationContext有父类,故先要执行父类的构造方法;父类的构造方法实例化一个工厂DefaultListableBeanFactory
public GenericApplicationContext() {this.beanFactory = new DefaultListableBeanFactory();}
到这里我们再来看一个类图:主要是BeanFactory介绍:
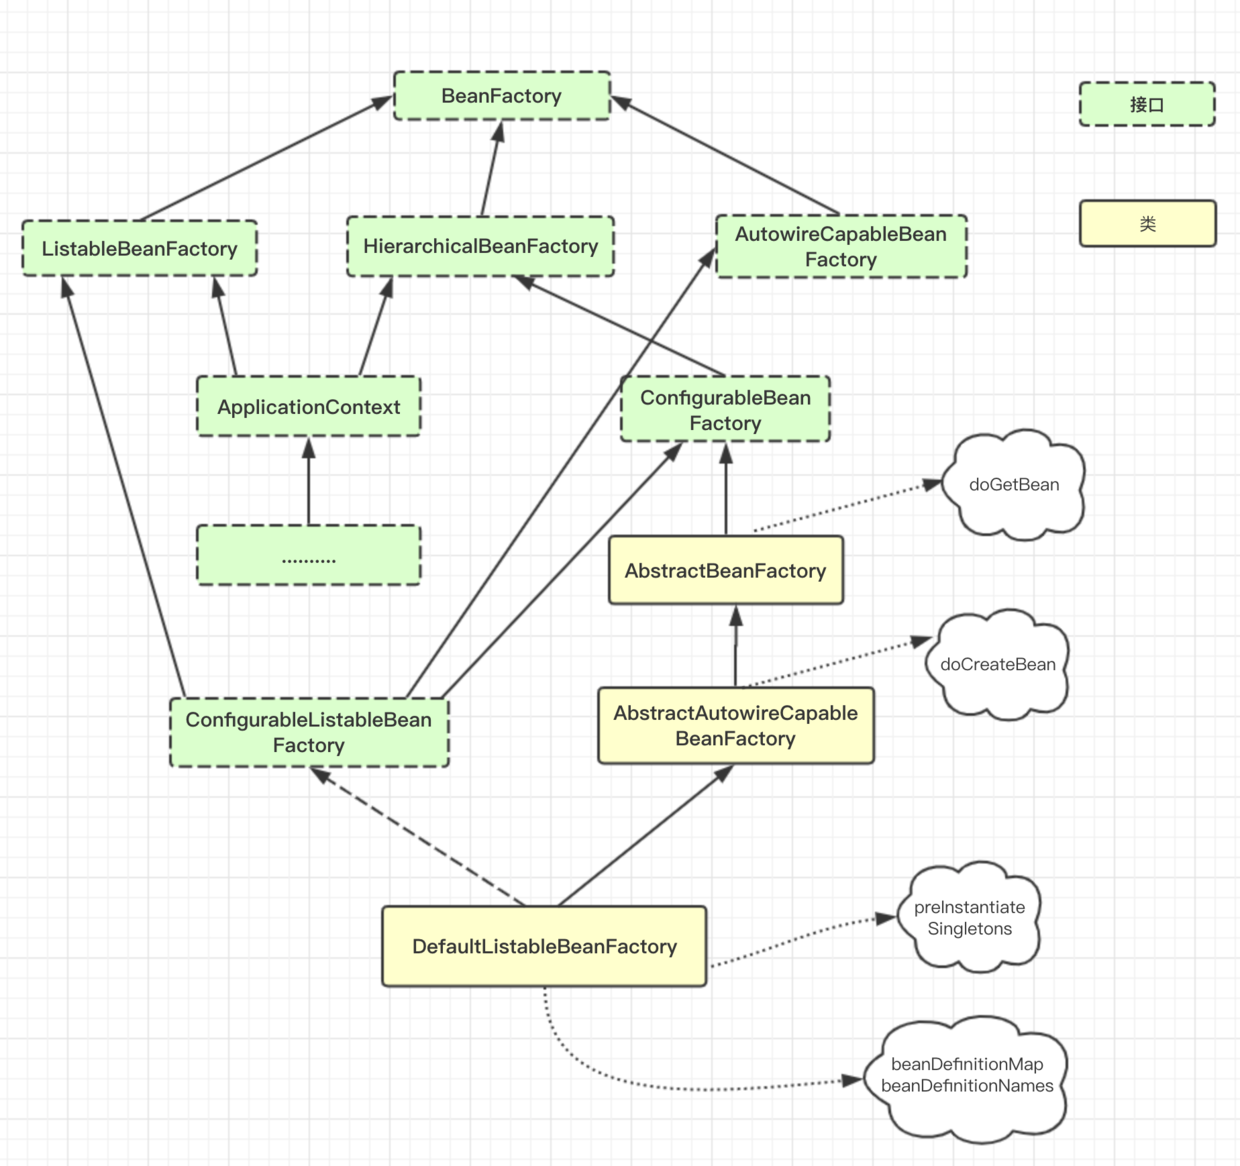
ApplicationContext 继承了 ListableBeanFactory,这个 Listable 的意思就是,通过这个接口,我们可以获取多个 Bean,大家看源码会发现,最顶层 BeanFactory 接口的方法都是获取单个 Bean 的。
ApplicationContext 继承了 HierarchicalBeanFactory,Hierarchical 单词本身已经能说明问题了,也就是说我们可以在应用中起多个 BeanFactory,然后可以将各个 BeanFactory 设置为父子关系。
AutowireCapableBeanFactory 这个名字中的 Autowire 大家都非常熟悉,它就是用来自动装配 Bean 用的,但是仔细看上图,ApplicationContext 并没有继承它,不过不用担心,不使用继承,不代表不可以使用组合,如果你看到 ApplicationContext 接口定义中的最后一个方法 getAutowireCapableBeanFactory() 就知道了。
ConfigurableListableBeanFactory 也是一个特殊的接口,看图,特殊之处在于它继承了第二层所有的三个接口,而 ApplicationContext 没有。这点之后会用到。
然后,请读者打开编辑器,翻一下 BeanFactory、ListableBeanFactory、HierarchicalBeanFactory、AutowireCapableBeanFactory、ApplicationContext 这几个接口的代码,
下面我们着重介绍一下DefaultListableBeanFactory,我们可以看到 ConfigurableListableBeanFactory 只有一个实现类 DefaultListableBeanFactory,而且实现类 DefaultListableBeanFactory 还通过实现右边的 AbstractAutowireCapableBeanFactory 通吃了右路。所以结论就是,最底下这个家伙 DefaultListableBeanFactory 基本上是最牛的 BeanFactory 了,这也是为什么这边会使用这个类来实例化的原因。上面在的构造方法中实例化了DefaultListableBeanFactory,DefaultListableBeanFactory类中定义了
private final Map<String, BeanDefinition> beanDefinitionMap = new ConcurrentHashMap<>(256);
和
private volatile List<String> beanDefinitionNames = new ArrayList<>(256);
至于这两个东西是做什么的,我们需要先了解一下BeanDefinition;
BeanDefinition介绍
我们来看下 BeanDefinition 的接口定义:
public interface BeanDefinition extends AttributeAccessor, BeanMetadataElement {// 我们可以看到,默认只提供 sington 和 prototype 两种,// 很多读者可能知道还有 request, session, globalSession, application, websocket 这几种,// 不过,它们属于基于 web 的扩展。String SCOPE_SINGLETON = ConfigurableBeanFactory.SCOPE_SINGLETON;String SCOPE_PROTOTYPE = ConfigurableBeanFactory.SCOPE_PROTOTYPE;// 比较不重要,直接跳过吧int ROLE_APPLICATION = 0;int ROLE_SUPPORT = 1;int ROLE_INFRASTRUCTURE = 2;// 设置父 Bean,这里涉及到 bean 继承,不是 java 继承。请参见附录的详细介绍// 一句话就是:继承父 Bean 的配置信息而已void setParentName(String parentName);// 获取父 BeanString getParentName();// 设置 Bean 的类名称,将来是要通过反射来生成实例的void setBeanClassName(String beanClassName);// 获取 Bean 的类名称String getBeanClassName();// 设置 bean 的 scopevoid setScope(String scope);String getScope();// 设置是否懒加载void setLazyInit(boolean lazyInit);boolean isLazyInit();// 设置该 Bean 依赖的所有的 Bean,注意,这里的依赖不是指属性依赖(如 @Autowire 标记的),// 是 depends-on="" 属性设置的值。void setDependsOn(String... dependsOn);// 返回该 Bean 的所有依赖String[] getDependsOn();// 设置该 Bean 是否可以注入到其他 Bean 中,只对根据类型注入有效,// 如果根据名称注入,即使这边设置了 false,也是可以的void setAutowireCandidate(boolean autowireCandidate);// 该 Bean 是否可以注入到其他 Bean 中boolean isAutowireCandidate();// 主要的。同一接口的多个实现,如果不指定名字的话,Spring 会优先选择设置 primary 为 true 的 beanvoid setPrimary(boolean primary);// 是否是 primary 的boolean isPrimary();// 如果该 Bean 采用工厂方法生成,指定工厂名称;// 一句话就是:有些实例不是用反射生成的,而是用工厂模式生成的void setFactoryBeanName(String factoryBeanName);// 获取工厂名称String getFactoryBeanName();// 指定工厂类中的 工厂方法名称void setFactoryMethodName(String factoryMethodName);// 获取工厂类中的 工厂方法名称String getFactoryMethodName();// 构造器参数ConstructorArgumentValues getConstructorArgumentValues();// Bean 中的属性值,后面给 bean 注入属性值的时候会说到MutablePropertyValues getPropertyValues();// 是否 singletonboolean isSingleton();// 是否 prototypeboolean isPrototype();// 如果这个 Bean 是被设置为 abstract,那么不能实例化,// 常用于作为 父bean 用于继承,其实也很少用......boolean isAbstract();int getRole();String getDescription();String getResourceDescription();BeanDefinition getOriginatingBeanDefinition();}
在Java中,一切皆对象。在JDK中使用java.lang.Class来描述类这个对象。
在Spring中,存在bean这样一个概念,那Spring又是怎么抽象bean这个概念,用什么类来描述bean这个对象呢?Spring使用BeanDefinition来描述bean。
BeanDefinition有很多子类例如:
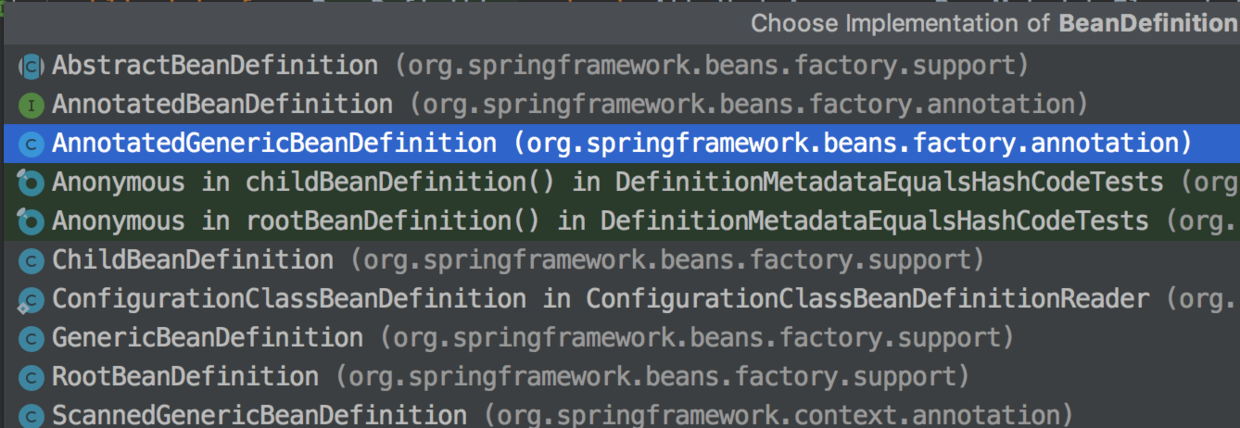
我们继续往下看
public AnnotationConfigApplicationContext() {/*** 创建一个读取注解的Bean定义读取器*/this.reader = new AnnotatedBeanDefinitionReader(this);//可以用来扫描包或者类,继而转换成BeanDefinition//但是实际上我们扫描包工作不是scanner这个对象来完成的而是//spring自己new的一个ClassPathBeanDefinitionScanner//这里的scanner仅仅是为了程序员能够在外部调用AnnotationConfigApplicationContext对象的scan方法this.scanner = new ClassPathBeanDefinitionScanner(this);}
上面代码首先在AnnotationConfigApplicationContext构造方法中实例化了一个读取器和扫描器;重点看上面的注释;
紧接着看下AnnotatedBeanDefinitionReader(this);里面做了什么事情
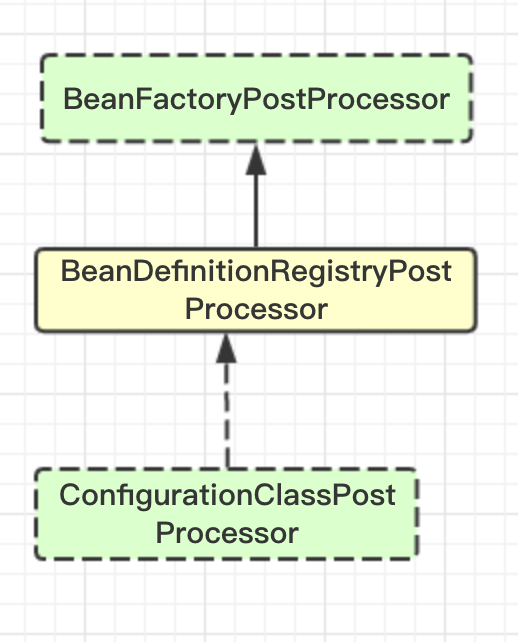
org.springframework.context.annotation.AnnotatedBeanDefinitionReader#AnnotatedBeanDefinitionReader(BeanDefinitionRegistry registry, Environment environment)org.springframework.context.annotation.AnnotationConfigUtils#registerAnnotationConfigProcessors(BeanDefinitionRegistry registry, @Nullable Object source)public static Set<BeanDefinitionHolder> registerAnnotationConfigProcessors(BeanDefinitionRegistry registry, @Nullable Object source) {DefaultListableBeanFactory beanFactory = unwrapDefaultListableBeanFactory(registry);if (beanFactory != null) {if (!(beanFactory.getDependencyComparator() instanceof AnnotationAwareOrderComparator)) {//AnnotationAwareOrderComparator主要能解析@Order注解和@PrioritybeanFactory.setDependencyComparator(AnnotationAwareOrderComparator.INSTANCE);}if (!(beanFactory.getAutowireCandidateResolver() instanceof ContextAnnotationAutowireCandidateResolver)) {//ContextAnnotationAutowireCandidateResolver提供处理延迟加载的功能beanFactory.setAutowireCandidateResolver(new ContextAnnotationAutowireCandidateResolver());}}Set<BeanDefinitionHolder> beanDefs = new LinkedHashSet<>(8);//BeanDefinitio的注册,这里很重要,需要理解注册每个bean的类型if (!registry.containsBeanDefinition(CONFIGURATION_ANNOTATION_PROCESSOR_BEAN_NAME)) {//需要注意的是ConfigurationClassPostProcessor的类型是BeanDefinitionRegistryPostProcessor//而 BeanDefinitionRegistryPostProcessor 最终实现BeanFactoryPostProcessor这个接口RootBeanDefinition def = new RootBeanDefinition(ConfigurationClassPostProcessor.class);def.setSource(source)beanDefs.add(registerPostProcessor(registry, def, CONFIGURATION_ANNOTATION_PROCESSOR_BEAN_NAME));}if (!registry.containsBeanDefinition(AUTOWIRED_ANNOTATION_PROCESSOR_BEAN_NAME)) {//AutowiredAnnotationBeanPostProcessor 实现了 MergedBeanDefinitionPostProcessor//MergedBeanDefinitionPostProcessor 最终实现了 BeanPostProcessorRootBeanDefinition def = new RootBeanDefinition(AutowiredAnnotationBeanPostProcessor.class);def.setSource(source);beanDefs.add(registerPostProcessor(registry, def, AUTOWIRED_ANNOTATION_PROCESSOR_BEAN_NAME));}if (!registry.containsBeanDefinition(REQUIRED_ANNOTATION_PROCESSOR_BEAN_NAME)) {RootBeanDefinition def = new RootBeanDefinition(RequiredAnnotationBeanPostProcessor.class);def.setSource(source);beanDefs.add(registerPostProcessor(registry, def, REQUIRED_ANNOTATION_PROCESSOR_BEAN_NAME));}//省略........return beanDefs;}
上面代码主要做了以下几件事:
拿到上面在父类构造方法中实例化的一个工厂DefaultListableBeanFactory
向DefaultListableBeanFactory工厂中添加AnnotationAwareOrderComparator主要解析@Order注解和@Priority处理优先级;
向DefaultListableBeanFactory工厂中添加ContextAnnotationAutowireCandidateResolver提供处理延迟加载的功能
注册spring内部自己定义的bean;并放入到beanDefinitionMap和beanDefinitionNames中,这里着重看一下
org.springframework.context.annotation.internalConfigurationAnnotationProcessor=ConfigurationClassPostProcessor这里有个印象后面会再次说到;
例如:
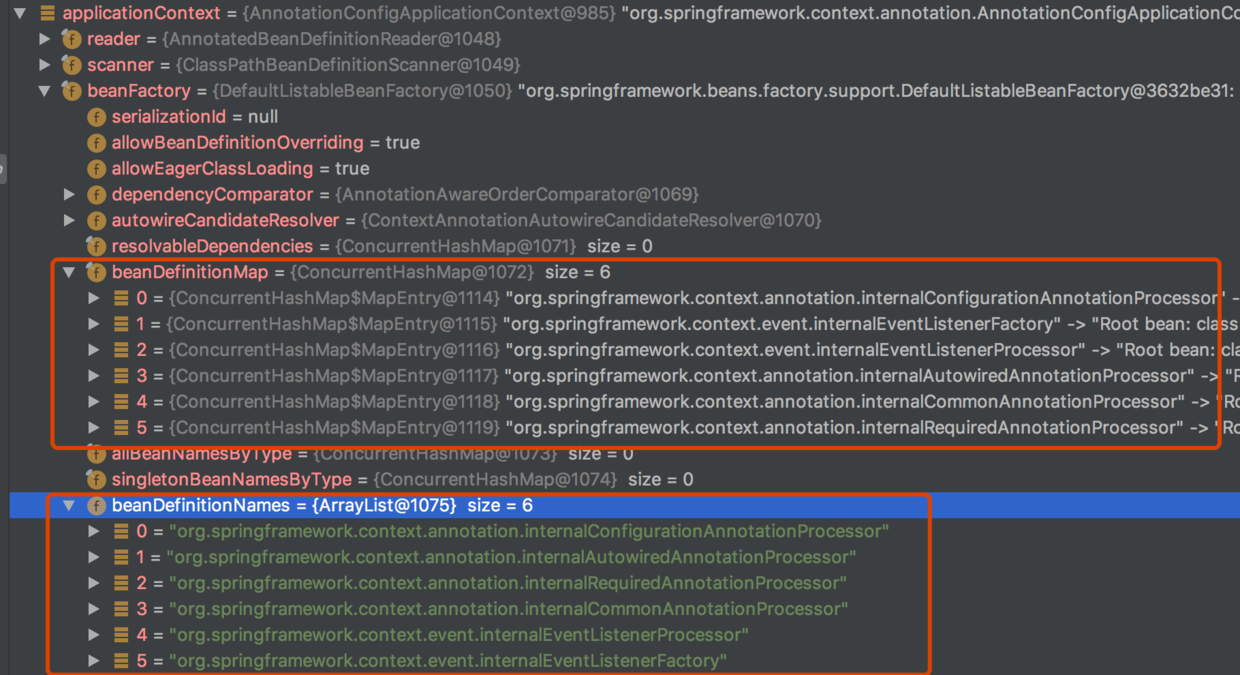
这个方法到这里就结束了,这就是 AnnotationConfigApplicationContext applicationContext = new AnnotationConfigApplicationContext();所做的事情;
register()方法介绍
我们接着看下面applicationContext.register(AppConfig.class);
public void register(Class<?>... annotatedClasses) {for (Class<?> annotatedClass : annotatedClasses) {registerBean(annotatedClass);}}public void registerBean(Class<?> annotatedClass) {doRegisterBean(annotatedClass, null, null, null);}
```
@Nullable Class<? extends Annotation>[] qualifiers, BeanDefinitionCustomizer… definitionCustomizers) {
/**
* 根据指定的bean创建一个BeanDefinition的子类AnnotatedGenericBeanDefinition* 这个AnnotatedGenericBeanDefinition可以理解为一个数据结构* AnnotatedGenericBeanDefinition包含了类的其他信息,比如一些元信息* scope,lazy等等**/AnnotatedGenericBeanDefinition abd = new AnnotatedGenericBeanDefinition(annotatedClass);/*** 判断这个类是否需要跳过解析* 通过代码可以知道spring判断是否跳过解析,主要判断类有没有加注解*/if (this.conditionEvaluator.shouldSkip(abd.getMetadata())) {return;}abd.setInstanceSupplier(instanceSupplier);/*** 得到类的作用域*/ScopeMetadata scopeMetadata = this.scopeMetadataResolver.resolveScopeMetadata(abd);/*** 把类的作用域添加到数据结构结构中*/abd.setScope(scopeMetadata.getScopeName());/*** 生成类的名字通过beanNameGenerator*/String beanName = (name != null ? name : this.beanNameGenerator.generateBeanName(abd, this.registry));/*** 处理类当中的通用注解* 分析源码可以知道他主要处理* Lazy DependsOn Primary Role等等注解* 处理完成之后processCommonDefinitionAnnotations中依然是把他添加到数据结构当中**/AnnotationConfigUtils.processCommonDefinitionAnnotations(abd);/*** 如果传参中带了这些注解类就会为true, 否则qualifiers一直为空* 因为这里传如的是null(doRegisterBean(annotatedClass, null, null, null);)*/if (qualifiers != null) {for (Class<? extends Annotation> qualifier : qualifiers) {////如果配置了@Primary注解,如果加了则作为首选if (Primary.class == qualifier) {abd.setPrimary(true);}//懒加载else if (Lazy.class == qualifier) {abd.setLazyInit(true);}else {//如果使用了除@Primary和@Lazy以外的其他注解,则为该Bean添加一个根据名字自动装配的限定符//这里难以理解,后面会详细介绍abd.addQualifier(new AutowireCandidateQualifier(qualifier));}}}//这里也为nullfor (BeanDefinitionCustomizer customizer : definitionCustomizers) {customizer.customize(abd);}/*** 这个BeanDefinitionHolder也是一个数据结构*/BeanDefinitionHolder definitionHolder = new BeanDefinitionHolder(abd, beanName);/*** ScopedProxyMode 跳过*/definitionHolder = AnnotationConfigUtils.applyScopedProxyMode(scopeMetadata, definitionHolder, this.registry);/*** 把上述的这个数据结构注册给registry* registry就是AnnotationConfigApplicationContext* AnnotationConfigApplicationContext在初始化的時候通過調用父類的構造方法* 实例化了一个DefaultListableBeanFactory* registerBeanDefinition里面就是把definitionHolder这个数据结构包含的信息注册到* DefaultListableBeanFactory这个工厂*/BeanDefinitionReaderUtils.registerBeanDefinition(definitionHolder, this.registry);}```
总结一下这个方法所做的事情:
根据指定的bean创建一个BeanDefinition的子类AnnotatedGenericBeanDefinition
得到当前类的作用域,当前传入的是AppConfig.class(默认是singleton);把类的作用域添加到AnnotatedGenericBeanDefinition中
生成bean的名字并放入BeanDefinitionHolder中
处理当前类使用的通用注解,详细看代码上的注释
实例化一个BeanDefinitionHolder,相当于一个中间媒介;来存放BeanDefinition和beanName然后注册给registry,这里的registry就是AnnotationConfigApplicationContext,在AnnotationConfigApplicationContext的父类中实例化了一个DefaultListableBeanFactory;DefaultListableBeanFactory 中有个Map集合
private final Map
就是在这个方法中将AppConfig.class放入到beanDefinitionMap 中的;那现在beanDefinitionMap 的size大小就是7个;到
BeanDefinitionReaderUtils.registerBeanDefinition(definitionHolder, this.registry);方法中看下;最终走了
org.springframework.beans.factory.support.DefaultListableBeanFactory#registerBeanDefinition方法中的
else {// Still in startup registration phasethis.beanDefinitionMap.put(beanName, beanDefinition);this.beanDefinitionNames.add(beanName);this.manualSingletonNames.remove(beanName);}
applicationContext.register(AppConfig.class);方法到这里也就结束了;
下面我们进入今天的重要部分:
refresh()方法
org.springframework.context.support.AbstractApplicationContext#refresh@Overridepublic void refresh() throws BeansException, IllegalStateException {synchronized (this.startupShutdownMonitor) {// Prepare this context for refreshing.//准备工作包括设置启动时间,是否激活标识位,// 初始化属性源(property source)配置prepareRefresh();// Tell the subclass to refresh the internal bean factory.//返回一个factory 为什么需要返回一个工厂//因为要对工厂进行初始化/** 这里说明一下:如果你使用是的xml配置的方式就会执行 AbstractRefreshableApplicationContext的refreshBeanFactory方法去加载xml配置信息;因为ClassPathXmlApplicationContext是它的子类;现在我们使用的是注解配置的方式所以会执行GenericApplicationContext的refreshBeanFactory方法,这个方法就是只返回了一个beanFactory**/ConfigurableListableBeanFactory beanFactory = obtainFreshBeanFactory();// Prepare the bean factory for use in this context.//准备工厂prepareBeanFactory(beanFactory);try {// Allows post-processing of the bean factory in context subclasses.//这个方法在当前版本的spring是没用任何代码的//可能spring期待在后面的版本中去扩展吧postProcessBeanFactory(beanFactory);// Invoke factory processors registered as beans in the context.//在spring的环境中去执行已经被注册的 factory processors//设置执行自定义的ProcessBeanFactory 和spring内部自己定义的invokeBeanFactoryPostProcessors(beanFactory);// Register bean processors that intercept bean creation.//注册beanPostProcessorregisterBeanPostProcessors(beanFactory);// Initialize message source for this context.// 初始化当前 ApplicationContext 的 MessageSource,国际化这里就不展开说了initMessageSource();// Initialize event multicaster for this context.//初始化应用事件广播器initApplicationEventMulticaster();// Initialize other special beans in specific context subclasses.// 从方法名就可以知道,典型的模板方法(钩子方法),// 具体的子类可以在这里初始化一些特殊的 Bean(在初始化 singleton beans 之前)onRefresh();// Check for listener beans and register them.// 注册事件监听器,监听器需要实现 ApplicationListener 接口。这也不是我们的重点,过registerListeners();// Instantiate all remaining (non-lazy-init) singletons.// 重点,重点,重点// 初始化所有的 singleton beans//(lazy-init 的除外)finishBeanFactoryInitialization(beanFactory);// Last step: publish corresponding event.// 最后,广播事件,ApplicationContext 初始化完成finishRefresh();}//.......
像prepareRefresh();,obtainFreshBeanFactory();都没有什么好说的看上面的注释就可以,这里我们简单介绍一下prepareBeanFactory(beanFactory);方法;
prepareBeanFactory()
protected void prepareBeanFactory(ConfigurableListableBeanFactory beanFactory) {// 设置 BeanFactory 的类加载器,我们知道 BeanFactory 需要加载类,也就需要类加载器,// 这里设置为加载当前 ApplicationContext 类的类加载器beanFactory.setBeanClassLoader(getClassLoader());//bean表达式解释器, 为了能够让我们的beanFactory去解析bean表达式beanFactory.setBeanExpressionResolver(new StandardBeanExpressionResolver(beanFactory.getBeanClassLoader()));//对象与string类型的转换 <property red="dao">//想深入了解参考 https://blog.csdn.net/pentiumchen/article/details/44026575beanFactory.addPropertyEditorRegistrar(new ResourceEditorRegistrar(this, getEnvironment()));//添加一个后置管理器ApplicationContextAwareProcessor// 能够在bean中获得到各种*Aware(*Aware都有其作用)// 这个我们很常用,如我们会为了获取 ApplicationContext 而 implement ApplicationContextAwarebeanFactory.addBeanPostProcessor(new ApplicationContextAwareProcessor(this));// 下面几行的意思就是,如果某个 bean 依赖于以下几个接口的实现类,在自动装配的时候忽略它们,// Spring 会通过其他方式来处理这些依赖。beanFactory.ignoreDependencyInterface(EnvironmentAware.class);beanFactory.ignoreDependencyInterface(EmbeddedValueResolverAware.class);beanFactory.ignoreDependencyInterface(ResourceLoaderAware.class);beanFactory.ignoreDependencyInterface(ApplicationEventPublisherAware.class);beanFactory.ignoreDependencyInterface(MessageSourceAware.class);beanFactory.ignoreDependencyInterface(ApplicationContextAware.class);// 下面几行就是为特殊的几个 bean 赋值,如果有 bean 依赖了以下几个,会注入这边相应的值,//MessageSource 被注册成为了一个普通的 beanbeanFactory.registerResolvableDependency(BeanFactory.class, beanFactory);beanFactory.registerResolvableDependency(ResourceLoader.class, this);beanFactory.registerResolvableDependency(ApplicationEventPublisher.class, this);beanFactory.registerResolvableDependency(ApplicationContext.class, this);// 这个 BeanPostProcessor 也很简单,在 bean 实例化后,如果是 ApplicationListener 的子类,// 那么将其添加到 listener 列表中,可以理解成:注册 事件监听器beanFactory.addBeanPostProcessor(new ApplicationListenerDetector(this));// 这里涉及到特殊的 bean,名为:loadTimeWeaver,这不是我们的重点,忽略它if (beanFactory.containsBean(LOAD_TIME_WEAVER_BEAN_NAME)) {beanFactory.addBeanPostProcessor(new LoadTimeWeaverAwareProcessor(beanFactory));// Set a temporary ClassLoader for type matching.beanFactory.setTempClassLoader(new ContextTypeMatchClassLoader(beanFactory.getBeanClassLoader()));}//意思是如果自定义的Bean中没有名为"systemProperties"和"systemEnvironment"的Bean,// 则注册两个Bena,Key为"systemProperties"和"systemEnvironment",Value为Map,// 这两个Bean就是一些系统配置和系统环境信息// Register default environment beans.if (!beanFactory.containsLocalBean(ENVIRONMENT_BEAN_NAME)) {beanFactory.registerSingleton(ENVIRONMENT_BEAN_NAME, getEnvironment());}if (!beanFactory.containsLocalBean(SYSTEM_PROPERTIES_BEAN_NAME)) {beanFactory.registerSingleton(SYSTEM_PROPERTIES_BEAN_NAME, getEnvironment().getSystemProperties());}if (!beanFactory.containsLocalBean(SYSTEM_ENVIRONMENT_BEAN_NAME)) {beanFactory.registerSingleton(SYSTEM_ENVIRONMENT_BEAN_NAME, getEnvironment().getSystemEnvironment());}}
上面prepareBeanFactory方法只是给beanFactory增加一些特殊的东西例如:表达式解析器,后置处理器,忽略一些特定的类;至此beanFactory中的beanDefinitionMap 的size大小依然还是7个;
postProcessBeanFactory(beanFactory);是一个空方法;
下面重点介绍一下invokeBeanFactoryPostProcessors(beanFactory);
invokeBeanFactoryPostProcessors()
protected void invokeBeanFactoryPostProcessors(ConfigurableListableBeanFactory beanFactory) {//这里的getBeanFactoryPostProcessors()是获取手动给spring的BeanFactoryPostProcessors()//何为手动给spring --> 手动调用AnnotationConfigApplicationContext.addBeanFactoryPostProcessor();//所以说自定义的BeanFactoryPostProcessors并非只有implements BeanFactoryPostProcessors才叫自定义//我们并没有手动去调用所以getBeanFactoryPostProcessors()的size = 0//这里问: 那如果我们自己去implements BeanFactoryPostProcessors 那getBeanFactoryPostProcessors()的size还会不会是0?//回答: 还是0! 因为我们自己implements BeanFactoryPostProcessors必须要加@Component,但是直到现在为止spring并没有开始扫描@Component//所以还是0PostProcessorRegistrationDelegate.invokeBeanFactoryPostProcessors(beanFactory, getBeanFactoryPostProcessors());// Detect a LoadTimeWeaver and prepare for weaving, if found in the meantime// (e.g. through an @Bean method registered by ConfigurationClassPostProcessor)if (beanFactory.getTempClassLoader() == null && beanFactory.containsBean(LOAD_TIME_WEAVER_BEAN_NAME)) {beanFactory.addBeanPostProcessor(new LoadTimeWeaverAwareProcessor(beanFactory));beanFactory.setTempClassLoader(new ContextTypeMatchClassLoader(beanFactory.getBeanClassLoader()));}}
进入invokeBeanFactoryPostProcessors(beanFactory, getBeanFactoryPostProcessors());方法
下面的信息量比较大,我们先看一下下面代码中需要的类图,先熟悉一下,有助于理解;
public static void invokeBeanFactoryPostProcessors(//List<BeanFactoryPostProcessor> beanFactoryPostProcessors 这个是我们手动传过来的ConfigurableListableBeanFactory beanFactory, List<BeanFactoryPostProcessor> beanFactoryPostProcessors) {// Invoke BeanDefinitionRegistryPostProcessors first, if any.Set<String> processedBeans = new HashSet<>();//这里肯定是会进的,当前的beanFactory 一直都是 DefaultListableBeanFactory,而DefaultListableBeanFactory是BeanDefinitionRegistry的子类if (beanFactory instanceof BeanDefinitionRegistry) {BeanDefinitionRegistry registry = (BeanDefinitionRegistry) beanFactory;//BeanDefinitionRegistryPostProcessor继承了BeanFactoryPostProcessor//BeanDefinitionRegistryPostProcessor功能比BeanFactoryPostProcessor更强大//我们自己要是想扩展有两种方式;1:实现BeanFactoryPostProcessor,2,BeanDefinitionRegistryPostProcessor,所以定义了两个来存放,//这里之所以实例化两个list的目的是:进行区分,spring对这两个有不同的处理方式List<BeanFactoryPostProcessor> regularPostProcessors = new LinkedList<>();List<BeanDefinitionRegistryPostProcessor> registryProcessors = new LinkedList<>();//这里是size=0;上面的代码注释中解释过for (BeanFactoryPostProcessor postProcessor : beanFactoryPostProcessors) {if (postProcessor instanceof BeanDefinitionRegistryPostProcessor) {BeanDefinitionRegistryPostProcessor registryProcessor =(BeanDefinitionRegistryPostProcessor) postProcessor;//如我们自己implements BeanDefinitionRegistryPostProcessor并且没有加@Component而是我们自己手动添加的ApplicationContext.addBeanFactoryPostProcessor(new TestBeanDefinitionRegistryPostProcessor());那么在下面这句话就会执行重写的方法;registryProcessor.postProcessBeanDefinitionRegistry(registry);registryProcessors.add(registryProcessor);} else {regularPostProcessors.add(postProcessor);}}//这里又定义了一个,和上面的区别是,这个currentRegistryProcessors 放的是spring内部自己实现了BeanDefinitionRegistryPostProcessor接口的对象List<BeanDefinitionRegistryPostProcessor> currentRegistryProcessors = new ArrayList<>();//BeanDefinitionRegistryPostProcessor 等于 BeanFactoryPostProcessor//getBeanNamesForType 根据bean的类型获取bean的名字 ConfigurationClassPostProcessor//这里的getBeanNamesForType代码就不展开了大致说下 就是拿到beanDefinitionNames中的7个值去对和BeanDefinitionRegistryPostProcessor对比看是否是他的子类//这里7个中只有一个ConfigurationClassPostProcessor是它的子类,所以值取到了一个ConfigurationClassPostProcessorString[] postProcessorNames =beanFactory.getBeanNamesForType(BeanDefinitionRegistryPostProcessor.class, true, false);//ConfigurationClassPostProcessor我们在最开始介绍注册spring内部自己定义的bean时,向beanDefinitionMap添加了6个(AppConfig.calss之外)中,其中一个就是它;//这里解释一下为什么要在最开始注册这个呢?因为spring的工厂需要去解析,扫描等等功能//而这些功能都是需要在spring工厂初始化完成之前执行//要么在工厂最开始的时候、要么在工厂初始化之中,反正不能再之后//因为如果在之后就没有意义,因为那个时候已经需要使用工厂了//所以这里Spring在一开始就注册了一个BeanFactoryPostProcessor,用来插手SpringFactory的实例化过程//而这个类叫做ConfigurationClassPostProcessorfor (String ppName : postProcessorNames) {if (beanFactory.isTypeMatch(ppName, PriorityOrdered.class)) {//添加到集合currentRegistryProcessors中currentRegistryProcessors.add(beanFactory.getBean(ppName, BeanDefinitionRegistryPostProcessor.class));//添加到processedBeans的Set集合中processedBeans.add(ppName);}}//排序不重要,况且currentRegistryProcessors这里也只有一个数据sortPostProcessors(currentRegistryProcessors, beanFactory);//合并list,不重要(为什么要合并,因为有我们自定义个还有spring自己内部实现的)registryProcessors.addAll(currentRegistryProcessors);/*** //最重要。注意这里是方法调用* //调用这个方法* //循环所有的BeanDefinitionRegistryPostProcessor* //该方法内部postProcessor.postProcessBeanDefinitionRegistry*/invokeBeanDefinitionRegistryPostProcessors(currentRegistryProcessors, registry);//这个list只是一个临时变量,故而要清除currentRegistryProcessors.clear();// 下面的代码先不看,等invokeBeanDefinitionRegistryPostProcessors(currentRegistryProcessors, registry);执行完之后我们回头再看....}
这里就不总结了,看上面的代码注释就很清楚了,下面
invokeBeanDefinitionRegistryPostProcessors(currentRegistryProcessors, registry);
是重点,我们进去看看做了什么事?
private static void invokeBeanDefinitionRegistryPostProcessors(Collection<? extends BeanDefinitionRegistryPostProcessor> postProcessors, BeanDefinitionRegistry registry) {//只有一条数据for (BeanDefinitionRegistryPostProcessor postProcessor : postProcessors) {postProcessor.postProcessBeanDefinitionRegistry(registry);}}
然后执行了
org.springframework.context.annotation.ConfigurationClassPostProcessor#postProcessBeanDefinitionRegistry
之后执行了
org.springframework.context.annotation.ConfigurationClassPostProcessor#processConfigBeanDefinitions
我们着重看下这个方法!
public void processConfigBeanDefinitions(BeanDefinitionRegistry registry) {//定义一个list 存放 applicationContext 提供的bdList<BeanDefinitionHolder> configCandidates = new ArrayList<>();//获取容器中注册的所有bd名字 这里会有7个String[] candidateNames = registry.getBeanDefinitionNames();/*** Full : 加了Configuration注解的类会被Sping标记为Full* Lite : 其他注解标记为Lite*///遍历beanName 拿出的所有bd(BeanDefinition),然后判断bd时候包含了@Configuration、@Import,@Compent。。。注解//这里循环7,但是有个6个我们都不需要看,我们只看AppConfigfor (String beanName : candidateNames) {//根据bean名称得到具体的BeanDefinitionBeanDefinition beanDef = registry.getBeanDefinition(beanName);//检查是否被处理过//如果BeanDefinition中的configurationClass属性为full或者lite,则意味着已经处理过了,直接跳过//进去下面checkConfigurationClassCandidate方法就会明白这句话的意思if (ConfigurationClassUtils.isFullConfigurationClass(beanDef) ||ConfigurationClassUtils.isLiteConfigurationClass(beanDef)) {if (logger.isDebugEnabled()) {logger.debug("Bean definition has already been processed as a configuration class: " + beanDef);}}//判断是否是Configuration类,如果加了Configuration注解下面的这几个注解就不再判断了/*** candidateIndicators.add(Component.class.getName());* candidateIndicators.add(ComponentScan.class.getName());* candidateIndicators.add(Import.class.getName());* candidateIndicators.add(ImportResource.class.getName());*/else if (ConfigurationClassUtils.checkConfigurationClassCandidate(beanDef, this.metadataReaderFactory)) {//BeanDefinitionHolder 也可以看成一个数据结构,将BeanDefinitionHolder添加到上面实例化的一个configCandidates集合中;configCandidates.add(new BeanDefinitionHolder(beanDef, beanName));}}// Return immediately if no @Configuration classes were foundif (configCandidates.isEmpty()) {return;}// 排序,根据order,不重要configCandidates.sort((bd1, bd2) -> {int i1 = ConfigurationClassUtils.getOrder(bd1.getBeanDefinition());int i2 = ConfigurationClassUtils.getOrder(bd2.getBeanDefinition());return Integer.compare(i1, i2);});//如果BeanDefinitionRegistry是SingletonBeanRegistry子类的话,// 由于我们当前传入的是DefaultListableBeanFactory,是SingletonBeanRegistry 的子类// 因此会将registry强转为SingletonBeanRegistrySingletonBeanRegistry sbr = null;if (registry instanceof SingletonBeanRegistry) {sbr = (SingletonBeanRegistry) registry;if (!this.localBeanNameGeneratorSet) {BeanNameGenerator generator = (BeanNameGenerator) sbr.getSingleton(CONFIGURATION_BEAN_NAME_GENERATOR);if (generator != null) {this.componentScanBeanNameGenerator = generator;this.importBeanNameGenerator = generator;}}}if (this.environment == null) {this.environment = new StandardEnvironment();}// 实例化ConfigurationClassParser 为了解析各个配置类ConfigurationClassParser parser = new ConfigurationClassParser(this.metadataReaderFactory, this.problemReporter, this.environment,this.resourceLoader, this.componentScanBeanNameGenerator, registry);//实例化2个set,candidates用于将之前加入的configCandidates进行去重//因为可能有多个配置类重复了//alreadyParsed用于判断是否处理过Set<BeanDefinitionHolder> candidates = new LinkedHashSet<>(configCandidates);Set<ConfigurationClass> alreadyParsed = new HashSet<>(configCandidates.size());do {//扫描包,将去重后的candidates集合传入;里面只有一个appConfigparser.parse(candidates);parser.validate();Set<ConfigurationClass> configClasses = new LinkedHashSet<>(parser.getConfigurationClasses());configClasses.removeAll(alreadyParsed);// Read the model and create bean definitions based on its contentif (this.reader == null) {this.reader = new ConfigurationClassBeanDefinitionReader(registry, this.sourceExtractor, this.resourceLoader, this.environment,this.importBeanNameGenerator, parser.getImportRegistry());}/**** 这里值得注意的是扫描出来的bean当中可能包含了特殊类* 比如ImportBeanDefinitionRegistrar那么也在这个方法里面处理* 但是并不是包含在configClasses当中* configClasses当中主要包含的是importSelector* 因为ImportBeanDefinitionRegistrar在扫描出来的时候已经被添加到一个list当中去了**///bd 到 mapthis.reader.loadBeanDefinitions(configClasses);alreadyParsed.addAll(configClasses);candidates.clear();if (registry.getBeanDefinitionCount() > candidateNames.length) {String[] newCandidateNames = registry.getBeanDefinitionNames();Set<String> oldCandidateNames = new HashSet<>(Arrays.asList(candidateNames));Set<String> alreadyParsedClasses = new HashSet<>();for (ConfigurationClass configurationClass : alreadyParsed) {alreadyParsedClasses.add(configurationClass.getMetadata().getClassName());}for (String candidateName : newCandidateNames) {if (!oldCandidateNames.contains(candidateName)) {BeanDefinition bd = registry.getBeanDefinition(candidateName);if (ConfigurationClassUtils.checkConfigurationClassCandidate(bd, this.metadataReaderFactory) &&!alreadyParsedClasses.contains(bd.getBeanClassName())) {candidates.add(new BeanDefinitionHolder(bd, candidateName));}}}candidateNames = newCandidateNames;}}while (!candidates.isEmpty());// Register the ImportRegistry as a bean in order to support ImportAware @Configuration classesif (sbr != null && !sbr.containsSingleton(IMPORT_REGISTRY_BEAN_NAME)) {sbr.registerSingleton(IMPORT_REGISTRY_BEAN_NAME, parser.getImportRegistry());}if (this.metadataReaderFactory instanceof CachingMetadataReaderFactory) {// Clear cache in externally provided MetadataReaderFactory; this is a no-op// for a shared cache since it'll be cleared by the ApplicationContext.((CachingMetadataReaderFactory) this.metadataReaderFactory).clearCache();}}
这个方法有点长,而且很重要,需要慢慢看;在这个方法中我们只需要针对AppConfig这个类看就可以了其他6个可以跳过;
我们先进入一下checkConfigurationClassCandidate方法,看看是怎么检查注解又怎么标识Full和Lite的;
public static boolean checkConfigurationClassCandidate(BeanDefinition beanDef, MetadataReaderFactory metadataReaderFactory) {String className = beanDef.getBeanClassName();if (className == null || beanDef.getFactoryMethodName() != null) {return false;}AnnotationMetadata metadata;//......由于篇幅原因,省略一些代码,用一句话来说明一下;这个metadata是怎么来的/**1,如果BeanDefinition 是 AnnotatedBeanDefinition的实例,并且className 和 BeanDefinition中的元 数据的类名相同,则直接从BeanDefinition 获得Metadata2,如果BeanDefinition 是 AbstractBeanDefinition的实例,并且beanDef 有 beanClass 属性存在则实例化StandardAnnotationMetadata**///判断当前这个bd中存在的类是不是加了@Configruation注解//如果存在则spring认为他是一个全注解的类if (isFullConfigurationCandidate(metadata)) {//如果存在Configuration 注解,则为BeanDefinition 设置configurationClass属性为fullbeanDef.setAttribute(CONFIGURATION_CLASS_ATTRIBUTE, CONFIGURATION_CLASS_FULL);}//判断是否加了以下注解,摘录isLiteConfigurationCandidate的源码// candidateIndicators.add(Component.class.getName());// candidateIndicators.add(ComponentScan.class.getName());// candidateIndicators.add(Import.class.getName());// candidateIndicators.add(ImportResource.class.getName());//如果不存在Configuration注解,spring则认为是一个部分注解类else if (isLiteConfigurationCandidate(metadata)) {beanDef.setAttribute(CONFIGURATION_CLASS_ATTRIBUTE, CONFIGURATION_CLASS_LITE);}else {return false;}// It's a full or lite configuration candidate... Let's determine the order value, if any.Integer order = getOrder(metadata);if (order != null) {beanDef.setAttribute(ORDER_ATTRIBUTE, order);}return true;}
isFullConfigurationCandidate();
public static boolean isFullConfigurationCandidate(AnnotationMetadata metadata) {return metadata.isAnnotated(Configuration.class.getName());}
isLiteConfigurationCandidate();
static {candidateIndicators.add(Component.class.getName());candidateIndicators.add(ComponentScan.class.getName());candidateIndicators.add(Import.class.getName());candidateIndicators.add(ImportResource.class.getName());}
下面我们重点分析parse方法
public void parse(Set<BeanDefinitionHolder> configCandidates) {this.deferredImportSelectors = new LinkedList<>();//根据BeanDefinition 的类型 做不同的处理,一般都会调用ConfigurationClassParser#parse 进行解析//遍历configCandidates中的BeanDefinitionHolder取出BeanDefinition//BeanDefinition中包含了AppConfig的一些属性信息for (BeanDefinitionHolder holder : configCandidates) {BeanDefinition bd = holder.getBeanDefinition();try {//当前bd类型就是AnnotatedBeanDefinition --> trueif (bd instanceof AnnotatedBeanDefinition) {//解析注解对象,并且把解析出来的bd放到map,但是这里的bd指的是普通的//何谓不普通的呢?比如@Bean 和各种beanFactoryPostProcessor得到的bean不在这里put//但是这里解析,只是put而已//Metadata中主要包含的是解析出来的注解,当前AppConfig 解析出来的注解是@Configuration,@ComponentScan//注解何时被解析出来的呢? 就是一开始将AppConfig 加载到BeanDefinitionMap中时;parse(((AnnotatedBeanDefinition) bd).getMetadata(), holder.getBeanName());}else if (bd instanceof AbstractBeanDefinition && ((AbstractBeanDefinition) bd).hasBeanClass()) {parse(((AbstractBeanDefinition) bd).getBeanClass(), holder.getBeanName());}else {parse(bd.getBeanClassName(), holder.getBeanName());}}catch (BeanDefinitionStoreException ex) {throw ex;}catch (Throwable ex) {throw new BeanDefinitionStoreException("Failed to parse configuration class [" + bd.getBeanClassName() + "]", ex);}}//处理延迟加载的importSelectprocessDeferredImportSelectors();}
然后进入真正的解析方法:
org.springframework.context.annotation.ConfigurationClassParser#parse(AnnotationMetadata, String)
在这个方法中又调用了:
org.springframework.context.annotation.ConfigurationClassParser#processConfigurationClass方法;
protected void processConfigurationClass(ConfigurationClass configClass) throws IOException {if (this.conditionEvaluator.shouldSkip(configClass.getMetadata(), ConfigurationPhase.PARSE_CONFIGURATION)) {return;}// 处理Imported 的情况//就是当前这个注解类有没有被别的类importConfigurationClass existingClass = this.configurationClasses.get(configClass);if (existingClass != null) {if (configClass.isImported()) {if (existingClass.isImported()) {existingClass.mergeImportedBy(configClass);}// Otherwise ignore new imported config class; existing non-imported class overrides it.return;}else {// Explicit bean definition found, probably replacing an imports.// Let's remove the old one and go with the new one.this.configurationClasses.remove(configClass);this.knownSuperclasses.values().removeIf(configClass::equals);}}// 递归地处理配置类及其超类层次结构。SourceClass sourceClass = asSourceClass(configClass);do {//解析注解并扫描sourceClass = doProcessConfigurationClass(configClass, sourceClass);}while (sourceClass != null);//一个map,用来存放扫描出来的bean(注意这里的bean不是对象,仅仅bean的信息,因为还没到实例化这一步)this.configurationClasses.put(configClass, configClass);}
然后进入doProcessConfigurationClass()方法,下面不重要的代码我就不贴了;
protected final SourceClass doProcessConfigurationClass(ConfigurationClass configClass, SourceClass sourceClass)throws IOException {//处理内部类 一般不会写内部类processMemberClasses(configClass, sourceClass);// 处理@PropertySource注释for (AnnotationAttributes propertySource : AnnotationConfigUtils.attributesForRepeatable(sourceClass.getMetadata(), PropertySources.class,org.springframework.context.annotation.PropertySource.class)) {if (this.environment instanceof ConfigurableEnvironment) {processPropertySource(propertySource);}else {logger.warn("Ignoring @PropertySource annotation on [" + sourceClass.getMetadata().getClassName() +"]. Reason: Environment must implement ConfigurableEnvironment");}}// 处理@ComponentScan注释Set<AnnotationAttributes> componentScans = AnnotationConfigUtils.attributesForRepeatable(sourceClass.getMetadata(), ComponentScans.class, ComponentScan.class);if (!componentScans.isEmpty() &&!this.conditionEvaluator.shouldSkip(sourceClass.getMetadata(), ConfigurationPhase.REGISTER_BEAN)) {for (AnnotationAttributes componentScan : componentScans) {// The config class is annotated with @ComponentScan -> perform the scan immediately//解析扫描的一些基本信息,比如是否过滤,比如是否加入新的包。。。。。includeFilters,excludeFilters等等都是ComponentScan中的属性//扫描普通类-->componentScan ---> com.haoxy//这里扫描出来所有@Component//并且把扫描的出来的普通bean放到map当中Set<BeanDefinitionHolder> scannedBeanDefinitions =this.componentScanParser.parse(componentScan, sourceClass.getMetadata().getClassName());// Check the set of scanned definitions for any further config classes and parse recursively if neededfor (BeanDefinitionHolder holder : scannedBeanDefinitions) {BeanDefinition bdCand = holder.getBeanDefinition().getOriginatingBeanDefinition();if (bdCand == null) {bdCand = holder.getBeanDefinition();}//检查扫描出来的类当中是否还有@Configurationif (ConfigurationClassUtils.checkConfigurationClassCandidate(bdCand, this.metadataReaderFactory)) {parse(bdCand.getBeanClassName(), holder.getBeanName());}}}}//下面是处理@Import imports 3种情况//ImportSelector//普通类//ImportBeanDefinitionRegistrar//这里和内部地柜调用时候的情况不同/*** 这里处理的import是需要判断我们的类当中时候有@Import注解* 如果有这把@Import当中的值拿出来,是一个类* 比如@Import(xxxxx.class),那么这里便把xxxxx传进去进行解析* 在解析的过程中如果发觉是一个importSelector那么就回调selector的方法* 返回一个字符串(类名),通过这个字符串得到一个类* 继而在递归调用本方法来处理这个类** 判断一组类是不是imports(3种import)**代码就不贴了,不是咱们这次研究的重点*/processImports(configClass, sourceClass, getImports(sourceClass), true);//..........}
上面的代码就是扫描普通类—-@Component,包括@Component子类: @Repository @Controller @service;并且放到了BeanDefinitionMap当中;
进入
org.springframework.context.annotation.ComponentScanAnnotationParser#parse
方法;这里就是处理ComponentScan注解中的一些属性;例如scopedProxy,scopeResolver,includeFilters,excludeFilters,lazyInit,basePackages,basePackageClasses,等…我们直接进入parse方法的org.springframework.context.annotation.ClassPathBeanDefinitionScanner#doScan方法;这个方法把@ComponentScan中的值传了过去;
protected Set<BeanDefinitionHolder> doScan(String... basePackages) {Assert.notEmpty(basePackages, "At least one base package must be specified");Set<BeanDefinitionHolder> beanDefinitions = new LinkedHashSet<>();//获取到包名for (String basePackage : basePackages) {//扫描basePackage路径下的java文件//符合条件的并把它转成BeanDefinition类型Set<BeanDefinition> candidates = findCandidateComponents(basePackage);for (BeanDefinition candidate : candidates) {//解析scope属性ScopeMetadata scopeMetadata = this.scopeMetadataResolver.resolveScopeMetadata(candidate);candidate.setScope(scopeMetadata.getScopeName());//生成bean名称String beanName = this.beanNameGenerator.generateBeanName(candidate, this.registry);if (candidate instanceof AbstractBeanDefinition) {//如果这个类是AbstractBeanDefinition的子类//则为他设置默认值,比如lazy,init destorypostProcessBeanDefinition((AbstractBeanDefinition) candidate, beanName);}if (candidate instanceof AnnotatedBeanDefinition) {//检查并且处理常用的注解//这里的处理主要是指把常用注解的值设置到AnnotatedBeanDefinition当中//当前前提是这个类必须是AnnotatedBeanDefinition类型的,说白了就是加了注解的类AnnotationConfigUtils.processCommonDefinitionAnnotations((AnnotatedBeanDefinition) candidate);}if (checkCandidate(beanName, candidate)) {BeanDefinitionHolder definitionHolder = new BeanDefinitionHolder(candidate, beanName);definitionHolder =AnnotationConfigUtils.applyScopedProxyMode(scopeMetadata, definitionHolder, this.registry);beanDefinitions.add(definitionHolder);//根据包名扫描到的类加载到beanDefinition map 中registerBeanDefinition(definitionHolder, this.registry);}}}return beanDefinitions;}
扫描候选组件的类路径方法:
org.springframework.context.annotation.ClassPathScanningCandidateComponentProvider#findCandidateComponents
public Set<BeanDefinition> findCandidateComponents(String basePackage) {if (this.componentsIndex != null && indexSupportsIncludeFilters()) {//根据索引获得bean定义,配合spring-context-indexer使用,有兴趣得自己去了解一下,这里不做具体得解析return addCandidateComponentsFromIndex(this.componentsIndex, basePackage);}else {//扫描获得bean定义return scanCandidateComponents(basePackage);}}
private Set<BeanDefinition> scanCandidateComponents(String basePackage) {Set<BeanDefinition> candidates = new LinkedHashSet<>();try {//classpath*:cn/haoxy/**/*.class ant path模式串String packageSearchPath = ResourcePatternResolver.CLASSPATH_ALL_URL_PREFIX +resolveBasePackage(basePackage) + '/' + this.resourcePattern;//这里resources有四个;分别是 TestBean.class,AppConfig.class,IndexDao.class,IndexDaoImpl.classResource[] resources = getResourcePatternResolver().getResources(packageSearchPath);boolean traceEnabled = logger.isTraceEnabled();boolean debugEnabled = logger.isDebugEnabled();//遍历resources;for (Resource resource : resources) {if (traceEnabled) {logger.trace("Scanning " + resource);}if (resource.isReadable()) {try {MetadataReader metadataReader = getMetadataReaderFactory().getMetadataReader(resource);//判断是否是我们需要的资源/*** 通过isCandidateComponent(MetadataReader metadataReader)来根据excludeFilters和includeFilters判断是否可以进行下一步的操作,* 如果这个资源被排除的filter匹配上,就返回false,代表不是我们所需要的。* 如果被包含的filter匹配上,并且他还要通过条件判断isConditionMatch的话,返回true,代表是我们需要的资源,可以进行下一步的操作。* 这里我们插一句Spring有默认的includ类型的filter实现,如果上层传入的话,就是用上层传入的,否则就使用默认的,* 默认的是扫描@Component注解以及他的子类@Repository @Controller @service*///显然这里只会匹配一个IndexDaoImpl.classif (isCandidateComponent(metadataReader)) {ScannedGenericBeanDefinition sbd = new ScannedGenericBeanDefinition(metadataReader);sbd.setResource(resource);sbd.setSource(resource);if (isCandidateComponent(sbd)) {if (debugEnabled) {logger.debug("Identified candidate component class: " + resource);}candidates.add(sbd);}//........省}catch (IOException ex) {throw new BeanDefinitionStoreException("I/O failure during classpath scanning", ex);}return candidates;}
这里只会有一个IndexDaoImpl符合我们的要求,放到candidates集合中并返回到doScan方法中;然后解析此类的作用域scope,生成bean名称等,然后调用registerBeanDefinition(definitionHolder, this.registry);方法把它加入到beanDefinitionMap集合中;
下面我们看看registerBeanDefinition(definitionHolder, this.registry)方法
从org.springframework.beans.factory.support.BeanDefinitionReaderUtils#registerBeanDefinition
方法转来转去最后转到了
org.springframework.beans.factory.support.DefaultListableBeanFactory#registerBeanDefinition方法;
public void registerBeanDefinition(String beanName, BeanDefinition beanDefinition)throws BeanDefinitionStoreException {Assert.hasText(beanName, "Bean name must not be empty");Assert.notNull(beanDefinition, "BeanDefinition must not be null");if (beanDefinition instanceof AbstractBeanDefinition) {try {((AbstractBeanDefinition) beanDefinition).validate();}catch (BeanDefinitionValidationException ex) {throw new BeanDefinitionStoreException(beanDefinition.getResourceDescription(), beanNam)....}}//所有的 Bean 注册后会放入这个 beanDefinitionMap 中//判断beanDefinitionMap中是否存在当前bean;之所以判断是因为我们可以配置允许bean覆盖BeanDefinition existingDefinition = this.beanDefinitionMap.get(beanName);//显然这里是不成立的,我们并没有配置允许bean覆盖,existingDefinition中也不会存在我们当前beanif (existingDefinition != null) {//如果进到这里说明我们允许了bean的覆盖if (!isAllowBeanDefinitionOverriding()) {// 如果不允许覆盖的话,抛异常throw new BeanDefinitionStoreException(beanDefinition.getResourceDescription(), beanName)....}else if (existingDefinition.getRole() < beanDefinition.getRole()) {//这里的代码都是打印日志 log....//日志内容: 用框架定义的 Bean 覆盖用户自定义的 Bean//.....else if (!beanDefinition.equals(existingDefinition)) {//log....//日志内容: 用新的 Bean 覆盖旧的 Bean}else {//log....//日志内容: 用同等的 Bean 覆盖旧的 Bean,这里指的是 equals 方法返回 true 的 Bean}//覆盖beanthis.beanDefinitionMap.put(beanName, beanDefinition);}else {//上面的if不成立就来到了这里;如果是普通bean(IndexDaoImpl等),这里返回是true,// 如果是AppConfig等特殊bean,Spring一开始就加载的会走下面的elseif (hasBeanCreationStarted()) {// Cannot modify startup-time collection elements anymore (for stable iteration)synchronized (this.beanDefinitionMap) {//以beanName为key,beanDefinition为value put 到 beanDefinitionMap中;//注意,"注册Bean" 这个动作结束,Bean 依然还没有初始化,我们后面会有大篇幅说初始化过程,this.beanDefinitionMap.put(beanName, beanDefinition);List<String> updatedDefinitions = new ArrayList<>(this.beanDefinitionNames.size() + 1);updatedDefinitions.addAll(this.beanDefinitionNames);updatedDefinitions.add(beanName);//将beanName 添加到 beanDefinitionNames集合中this.beanDefinitionNames = updatedDefinitions;if (this.manualSingletonNames.contains(beanName)) {Set<String> updatedSingletons = new LinkedHashSet<>(this.manualSingletonNames);updatedSingletons.remove(beanName);this.manualSingletonNames = updatedSingletons;}}}//特殊beanelse {// Still in startup registration phase//同样是以beanName为key,beanDefinition为value put 到 beanDefinitionMap中;this.beanDefinitionMap.put(beanName, beanDefinition);//将beanName 添加到 beanDefinitionNames集合中this.beanDefinitionNames.add(beanName);//这LinkedHashSet存放的是:environment,systemProperties,systemEnvironment//都是一些系统环境,系统属性,这里对我们不重要this.manualSingletonNames.remove(beanName);}// 这个不重要,在预初始化的时候会用到,不必管它。this.frozenBeanDefinitionNames = null;}if (existingDefinition != null || containsSingleton(beanName)) {resetBeanDefinition(beanName);}}
这时候beanDefinitionMap的size大小就是8个了;然后放到beanDefinitions集合中返回;这里只是把它加入到beanDefinitionMap集合中还没有进行初始化;上面就是@ComponentScan注解作用的扫描BeanDefination的全部过程了。这一篇文章终于结束了,好累,自己总结了一遍印象更深刻一些;
bean的创建及初始化就参考:Spring源码分析:SpringIOC初始化过程源码分析-基于配置文件模式(三)文章的后面部分就可以了!
参考:https://www.haoxiaoyong.cn/2019/12/01/2019/2019-12-01-spring1/
