


我们在使用SpringBoot的时候,是不是觉得特方便,根本不需要我们去配置什么端口号,应用名称,又比如我们再整合redis的时候,其实也不需要我们去指定端口号,IP,都会有默认的。是不是特方便。那么SpringBoot到底是怎么实现自动配置的呢。我们这里来分析下。
一、什么是自动配置
要了解SpringBoot的自动配置,我们得先理解啥是自动配置,字面上理解就是配置是自动化的,不需要我们额外的编配置文件,全部都有默认的配置。若是我们的项目都用SpringBoot提供的默认配置,那么理论上来说我们可以实现完全的零配置开发。“自动”的表现形式就是我们只需要引我们想用功能的包,相关的配置我们完全不用管。
误区:我刚开始以为自动配置的意思是自动继集成了了各种redis、mybatis插件,然后我就一直弄不懂为什么我明明不需要这些插件都还要给我集成。其实我是转牛角尖,指示自动帮我们初始化默认配置文件,其实是配置类而已。相信这个误区只有我这种爱转牛角尖的人才会多想。
二、SpringBoot加载自定义配置
我明要学习SpringBoot的自动化配置,那么我们来先学习一下SpringBoot是怎么加载自定义的配置的。如下新建一个最简单的SpringBoot项目,当然是maven的啦。可以参考我的本标签的博文二、快速入门-Hello SpringBoot2.0,这里我们就建立两个类,一个是配置类Config,一个是启动类App,还要建立一个配置文件application.yml,项目目录如下: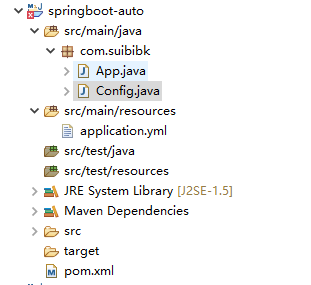
我们这里要实现的就是,把配置文件定义的key值赋值给Config。
1、Config
@ConfigurationProperties(prefix="config")public class Config {private String username="随笔博客";public String getUsername() {return username;}public void setUsername(String username) {this.username = username;}}
@ConfigurationProperties注解可以注入在application.properties配置文件中的属性。
2、App
@SpringBootApplication@RestControllerpublic class App {@Autowiredprivate Config config;@RequestMapping("/hello")public String hello() {System.out.println(config.getUsername());return "hello";}public static void main(String[] args) {SpringApplication.run(App.class, args);}}
3、application.yml
config:username: suibibk
4、在App这个类里注入Config类对象
有如下几种方法。
A、在Config上使用注解@Component
@Component@ConfigurationProperties(prefix="config")public class Config {
B、在Config上使用注解@Configuration
@Configuration@ConfigurationProperties(prefix="config")public class Config {
C、在App中用@Bean
@Beanpublic Config config() {return new Config();}
D、在App上加入如下注解
@EnableConfigurationProperties(Config.class)public class App {
@EnableConfigurationProperties注解的作用是:使使用 @ConfigurationProperties 注解的类生效。
5、总结
上面四种方法都可以实现读取配置文件的信息,并且这里默认有一个值“随笔博客”,到这里,是不是觉得可能SpringBoot也是用这种方式定义了超级多自动配置类?哈哈哈 ,太晚了先休息,且听下回分析。
三、SpringBoot启动流程自动配置流程分析
由上面我们可以知道,也许SpringBoot也是在启动的时候自动把很多组件默认的配置加载进容器中了,这样子我们再加入某一组件比如redis后就可以不需要指定配置(如果没有个性化的话)。我们来一起跟踪下吧。
1、启动类App
@SpringBootApplicationpublic class App {
我们的启动类就只用一个注解@SpringBootApplication就可以启动我们的SpringBoot应用了。那么我们跟踪这个注解进去。
2、SpringBootApplication
@Target(ElementType.TYPE)@Retention(RetentionPolicy.RUNTIME)@Documented@Inherited@SpringBootConfiguration@EnableAutoConfiguration@ComponentScan(excludeFilters = {@Filter(type = FilterType.CUSTOM, classes = TypeExcludeFilter.class),@Filter(type = FilterType.CUSTOM, classes = AutoConfigurationExcludeFilter.class) })public @interface SpringBootApplication {
这里我们主要要看两个注解,一个是@SpringBootConfiguration,跟踪进去如下
@Target(ElementType.TYPE)@Retention(RetentionPolicy.RUNTIME)@Documented@Configurationpublic @interface SpringBootConfiguration {
我们看到了@Configuration注解,这个注解顾名思义,表明这是一个配置类,也就是说,我们的App也是一个配置类,这也就解释了为什么上面我们再App上可以用如下方法注入bean
@Beanpublic Config config() {return new Config();}
其实上面@SpringBootConfiguration跟自动配置没有啥关系,主要我们要看@EnableAutoConfiguration注解,跟踪进去。
3、EnableAutoConfiguration
@Target(ElementType.TYPE)@Retention(RetentionPolicy.RUNTIME)@Documented@Inherited@AutoConfigurationPackage@Import(AutoConfigurationImportSelector.class)public @interface EnableAutoConfiguration {
顺便提一起,下面四个是元注解
@Target(ElementType.TYPE)@Retention(RetentionPolicy.RUNTIME)@Documented@Inherited
这里我们先看@AutoConfigurationPackage注解
Storing auto-configuration packages for reference later (e.g. by JPA entity scanner).保存自动配置类以供之后的使用,比如给JPA entity扫描器用来扫描开发人员通过注解@Entity定义的entity类。
也就是说,这个类跟@ComponentScan是不同的,@ComponentScan注解默认就会装配标识了@Controller,@Service,@Repository,@Component注解的类到spring容器中,而@AutoConfigurationPackage注解主要扫描的是@Entity这种注解。
然后我们最主要的是看@Import(AutoConfigurationImportSelector.class)这个注解,@Import注解支持导入普通的java类,并将其声明成一个bean,所以相当于是将AutoConfigurationImportSelector类实例化为bean加入容器中。我们跟踪进去。
4、AutoConfigurationImportSelector
public class AutoConfigurationImportSelectorimplements DeferredImportSelector, BeanClassLoaderAware, ResourceLoaderAware,BeanFactoryAware, EnvironmentAware, Ordered {
我们这里可以看DeferredImportSelector类,跟踪进去
public interface DeferredImportSelector extends ImportSelector {
再跟踪进去ImportSelector
public interface ImportSelector {/*** Select and return the names of which class(es) should be imported based on* the {@link AnnotationMetadata} of the importing @{@link Configuration} class.*/String[] selectImports(AnnotationMetadata importingClassMetadata);}
再SpringBoot中,若是用@Import注解导入的实现了ImportSelector接口的类,会在启动的时候自动调用selectImports方法。这个我们其实可以测试下,写一个类比如ConfigData,实现ImportSelector接口,然后在App启动类上加入如下注解:
@Import(ConfigData.class)
你会发现,在启动App后会自动调用ConfigData的selectImports方法。
那么在这里我们看一下同样是实现了ImportSelector接口,当然是通过实现DeferredImportSelector接口来实现的AutoConfigurationImportSelector类的selectImports方法,该方法也会在App启动的时候被调用。
@Overridepublic String[] selectImports(AnnotationMetadata annotationMetadata) {if (!isEnabled(annotationMetadata)) {return NO_IMPORTS;}try {AutoConfigurationMetadata autoConfigurationMetadata = AutoConfigurationMetadataLoader.loadMetadata(this.beanClassLoader);AnnotationAttributes attributes = getAttributes(annotationMetadata);List<String> configurations = getCandidateConfigurations(annotationMetadata,attributes);configurations = removeDuplicates(configurations);configurations = sort(configurations, autoConfigurationMetadata);Set<String> exclusions = getExclusions(annotationMetadata, attributes);checkExcludedClasses(configurations, exclusions);configurations.removeAll(exclusions);configurations = filter(configurations, autoConfigurationMetadata);fireAutoConfigurationImportEvents(configurations, exclusions);return StringUtils.toStringArray(configurations);}catch (IOException ex) {throw new IllegalStateException(ex);}}
这里我们主要看如下语句
List<String> configurations = getCandidateConfigurations(annotationMetadata,attributes);
因为这个语句的字面意思就是读取配置,所以我们跟踪进入这个方法中去。也是属于这个类的方法(废话)。
protected List<String> getCandidateConfigurations(AnnotationMetadata metadata,AnnotationAttributes attributes) {List<String> configurations = SpringFactoriesLoader.loadFactoryNames(getSpringFactoriesLoaderFactoryClass(), getBeanClassLoader());Assert.notEmpty(configurations,"No auto configuration classes found in META-INF/spring.factories. If you "+ "are using a custom packaging, make sure that file is correct.");return configurations;}
我们再跟踪进入 SpringFactoriesLoader.loadFactoryNames方法
public static List<String> loadFactoryNames(Class<?> factoryClass, @Nullable ClassLoader classLoader) {String factoryClassName = factoryClass.getName();return loadSpringFactories(classLoader).getOrDefault(factoryClassName, Collections.emptyList());}
当然继续跟踪进入loadSpringFactories方法
private static Map<String, List<String>> loadSpringFactories(@Nullable ClassLoader classLoader) {MultiValueMap<String, String> result = cache.get(classLoader);if (result != null)return result;try {Enumeration<URL> urls = (classLoader != null ?classLoader.getResources(FACTORIES_RESOURCE_LOCATION) :ClassLoader.getSystemResources(FACTORIES_RESOURCE_LOCATION));result = new LinkedMultiValueMap<>();while (urls.hasMoreElements()) {URL url = urls.nextElement();UrlResource resource = new UrlResource(url);Properties properties = PropertiesLoaderUtils.loadProperties(resource);for (Map.Entry<?, ?> entry : properties.entrySet()) {List<String> factoryClassNames = Arrays.asList(StringUtils.commaDelimitedListToStringArray((String) entry.getValue()));result.addAll((String) entry.getKey(), factoryClassNames);}}cache.put(classLoader, result);return result;}catch (IOException ex) {throw new IllegalArgumentException("Unable to load factories from location [" +FACTORIES_RESOURCE_LOCATION + "]", ex);}}
这里看到加载了资源文件FACTORIES_RESOURCE_LOCATION,对应的文件是
public static final String FACTORIES_RESOURCE_LOCATION = "META-INF/spring.factories";
META-INF/spring.factories,也就是加载在全部META-INF下面的spring.fatories文件。当然这里我们直接去查看自动配置包下面的这个文件,如下图位置: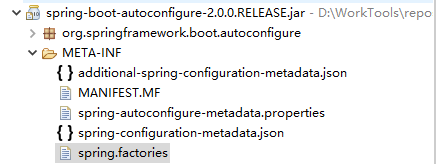
打开可以看到如下内容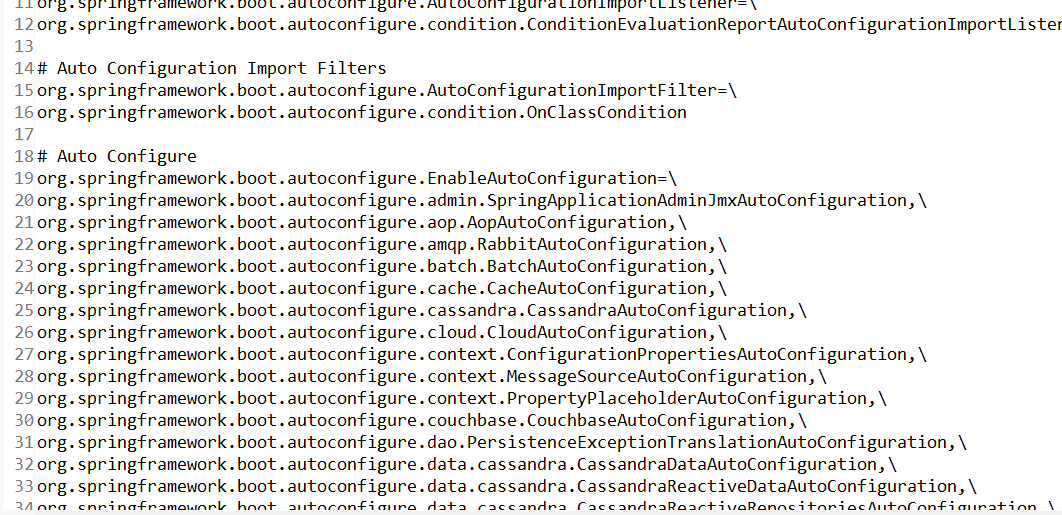
可以看到注释#Auto Configure
这里对应的所有Class就是在SpringBoot启动的时候实现自动配置的类。
我们可以举个例子看一下是怎么实现自动配置的我们举个例子
org.springframework.boot.autoconfigure.data.redis.RedisAutoConfiguration
5、RedisAutoConfiguration
@Configuration@ConditionalOnClass(RedisOperations.class)@EnableConfigurationProperties(RedisProperties.class)@Import({ LettuceConnectionConfiguration.class, JedisConnectionConfiguration.class })public class RedisAutoConfiguration {@Bean@ConditionalOnMissingBean(name = "redisTemplate")public RedisTemplate<Object, Object> redisTemplate(RedisConnectionFactory redisConnectionFactory) throws UnknownHostException {RedisTemplate<Object, Object> template = new RedisTemplate<>();template.setConnectionFactory(redisConnectionFactory);return template;}@Bean@ConditionalOnMissingBean(StringRedisTemplate.class)public StringRedisTemplate stringRedisTemplate(RedisConnectionFactory redisConnectionFactory) throws UnknownHostException {StringRedisTemplate template = new StringRedisTemplate();template.setConnectionFactory(redisConnectionFactory);return template;}}
可以很明显的看到上面有注解@EnableConfigurationProperties(RedisProperties.class),这不就跟我们一开始说的一样么,RedisProperties会自动实例化bean加入到IOC容器中。此时我们redis想用,就直接用啦,不需要我们写配置文件。跟踪RedisProperties进去可看到
@ConfigurationProperties(prefix = "spring.redis")public class RedisProperties {/*** Database index used by the connection factory.*/private int database = 0;/*** Connection URL. Overrides host, port, and password. User is ignored. Example:* redis://user:password@example.com:6379*/private String url;/*** Redis server host.*/private String host = "localhost";/*** Login password of the redis server.*/private String password;/*** Redis server port.*/private int port = 6379;
很明显跟我们一开始加载自定义配置是一样的,我们会有个默认值,比如host为localhost,端口号为6379,当然我们也可以在application.yml配置文件中覆盖,前缀为spring.redis。
好了,到这里我们就应该知道SpringBoot是如何实现自动化配置的了。就是在META-INF/spring.factories的这个文件中,配置好所有需要配置的类,比如redis,elasticsearch,freemarker,jdbc等等我们经常要集成的组件的配置类,然后在容器启动的时候就全部这些配置类注入到IOC容器中,有组件想使用的话就直接从容器中读取对应的配置,完全可以做到零配置,也可以做到自定义配置来覆盖默认配置。
顺便提一下@ConditionalOnMissingBean注解,我们先看如下说明。
@ConditionalOnBean:当容器里有指定的bean的条件下。@ConditionalOnMissingBean:当容器里不存在指定bean的条件下。@ConditionalOnClass:当类路径下有指定类的条件下。@ConditionalOnMissingClass:当类路径下不存在指定类的条件下。@ConditionalOnProperty:指定的属性是否有指定的值,比如@ConditionalOnProperties(prefix=”xxx.xxx”, value=”enable”, matchIfMissing=true),代表当xxx.xxx为enable时条件的布尔值为true,如果没有设置的情况下也为true。
也就是上面RedisAutoConfiguration下的代码的作用是:
@Bean@ConditionalOnMissingBean(name = "redisTemplate")public RedisTemplate<Object, Object> redisTemplate(RedisConnectionFactory redisConnectionFactory) throws UnknownHostException {RedisTemplate<Object, Object> template = new RedisTemplate<>();template.setConnectionFactory(redisConnectionFactory);return template;}
党容器中没有redisTemplate对象的时候,就这里实例化一个bean放入到容器中。
6、那自动配配置类如何实例化的呢?
也许有细心的兄弟,会觉得代码里selectImports不是只是加载了配置的类名么,那么像RedisAutoConfiguration这些配置类什么时候实例化的呢,其实这得还是归功于ImportSelector接口的厉害了,实现这个接口的类,在@Import导入后,会自动调用selectImports方法,然后这个方法返回的类名数组都会自动实例化。也就是这样,那些自动化配置类全部实例化了没然后对应的配置文件类也全部自动实例化了,他厉害了,拜服。ImportSelector接口的具体原理看来以后得好好研究。
当然这里也可以写一个很简单的例子证明下ImportSelector。如下
public class User {public void test() {System.out.println("随笔博客");}}
public class DataConfig implements ImportSelector{public String[] selectImports(AnnotationMetadata importingClassMetadata) {return new String[]{User.class.getName()};}}
然后在App中使用@Import
@SpringBootApplication@RestController@Import(DataConfig.class)public class App {@Autowiredprivate User user;@RequestMapping("/hello")public String hello() {user.test();return "hello";}public static void main(String[] args) {SpringApplication.run(App.class, args);}}
启动访问http://localhost:8080/hello, 可以看到控制台打印随笔博客。
哈哈哈 到这里基本上搞明白了。
总结
通过上面分析,相信大家对SpringBoot自动化配置应该很清楚了,无非就是在启动的时候把各常用组件的配置文件类实例化到IOC容器中。我们根据上面的代码跟踪可以了解,SpringBoot的实现方式真的是太精妙了,不得不佩服,受益良多。
完全纯手打,写博文不易,转载请注明来自:
随笔博客:https://www.suibibk.com
SpringBoot自动配置原理大解析:https://www.suibibk.com/topic/565678359363715072
